
Intro
Your support needs to grow with the size of your website. People browsing your shop have different questions than those checking your documentation, international visitors prefer support in their own language, and you might want to use a different approach mode depending on whether your contacts are using a desktop or a mobile device.
Our Widget routers make the handling of all these scenarios a breeze. You can easily configure rules that select different Widgets depending on the information we have about your contacts: the section of the website they are on when starting a conversation, which country they are from, which language they prefer in their browsers, etc. Managing individual chat setups has never been easier.
Setup
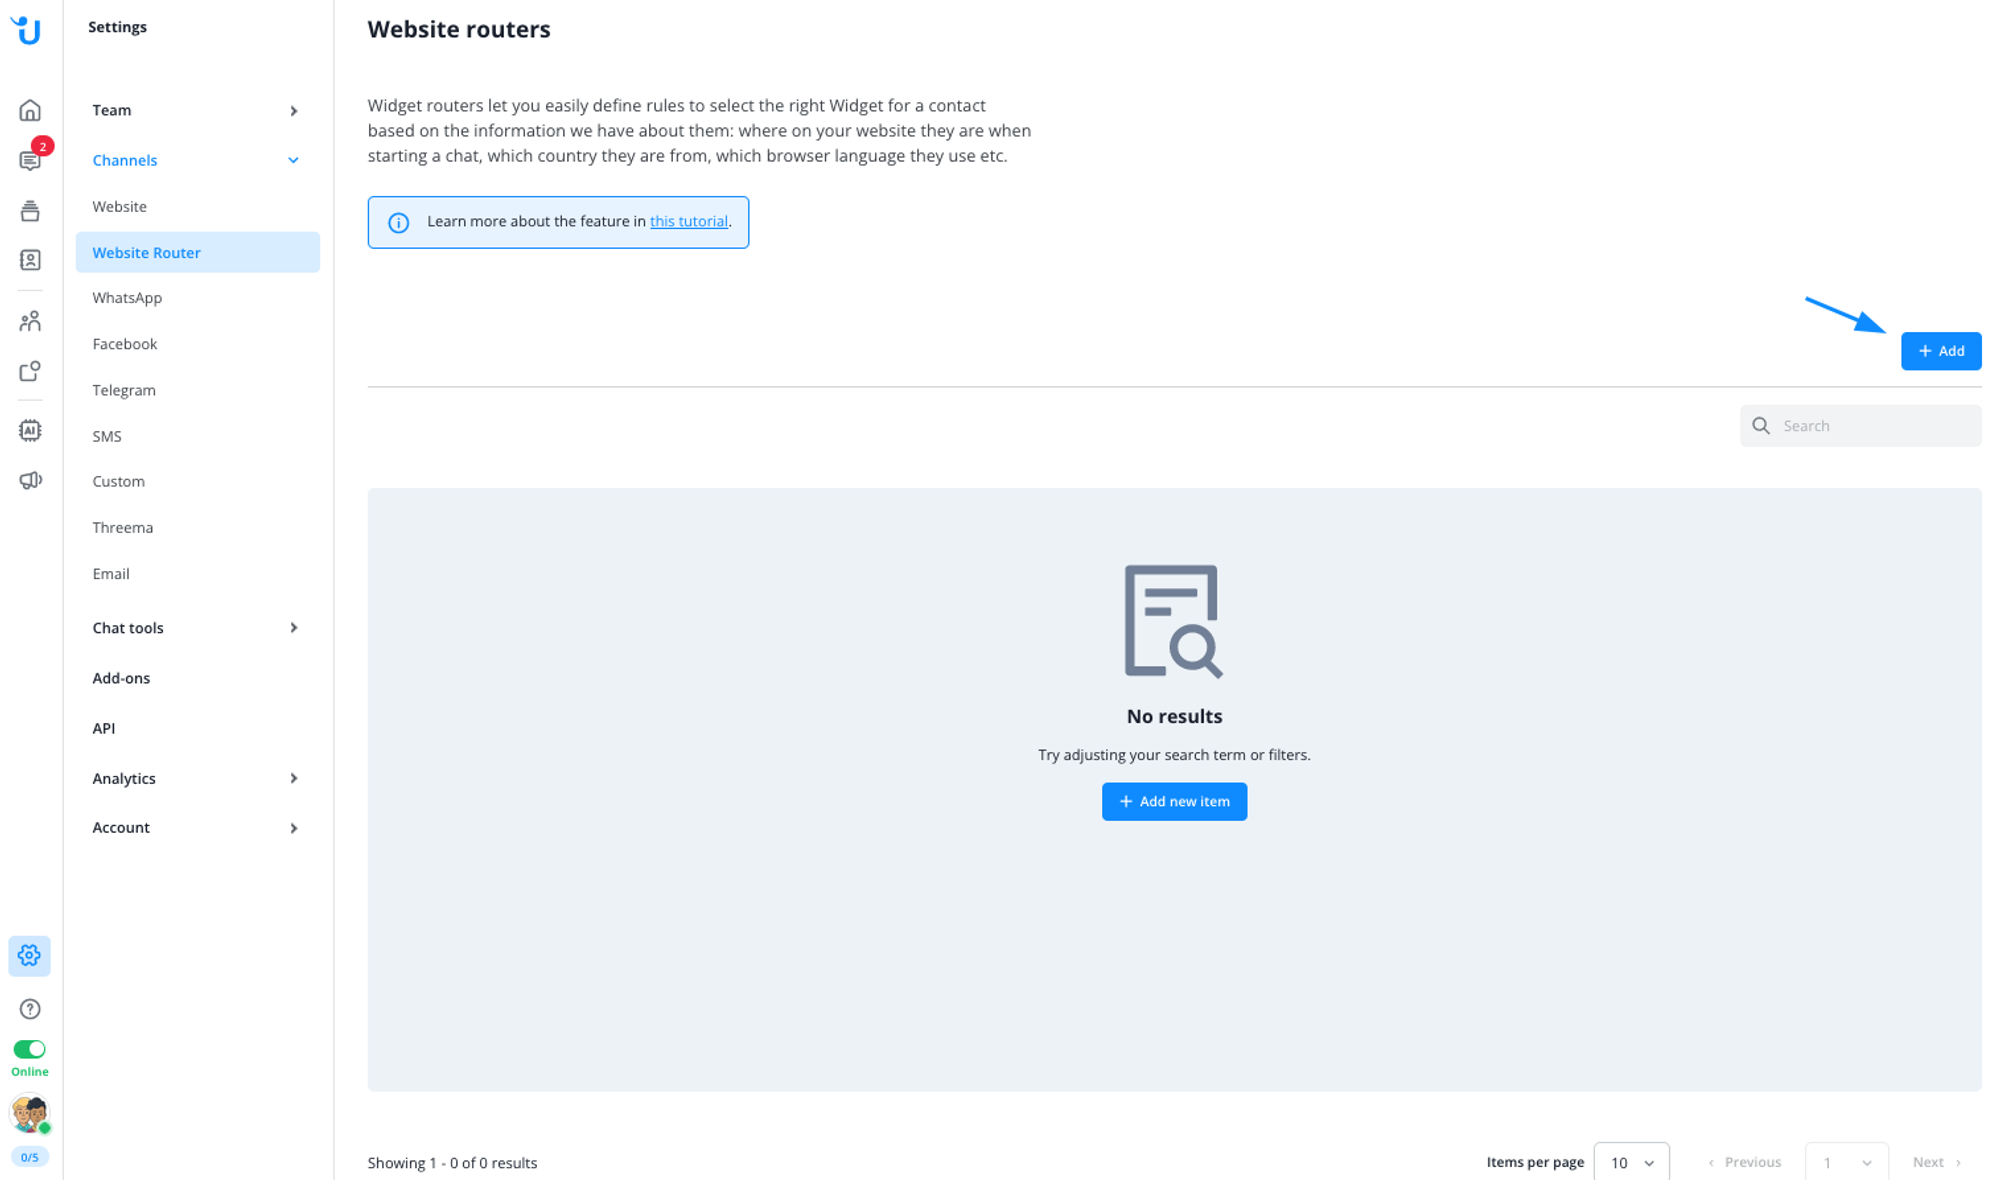
In your Dashboard, go to Channels > Website routers:
Click Add Widget router to create a new Widget router:
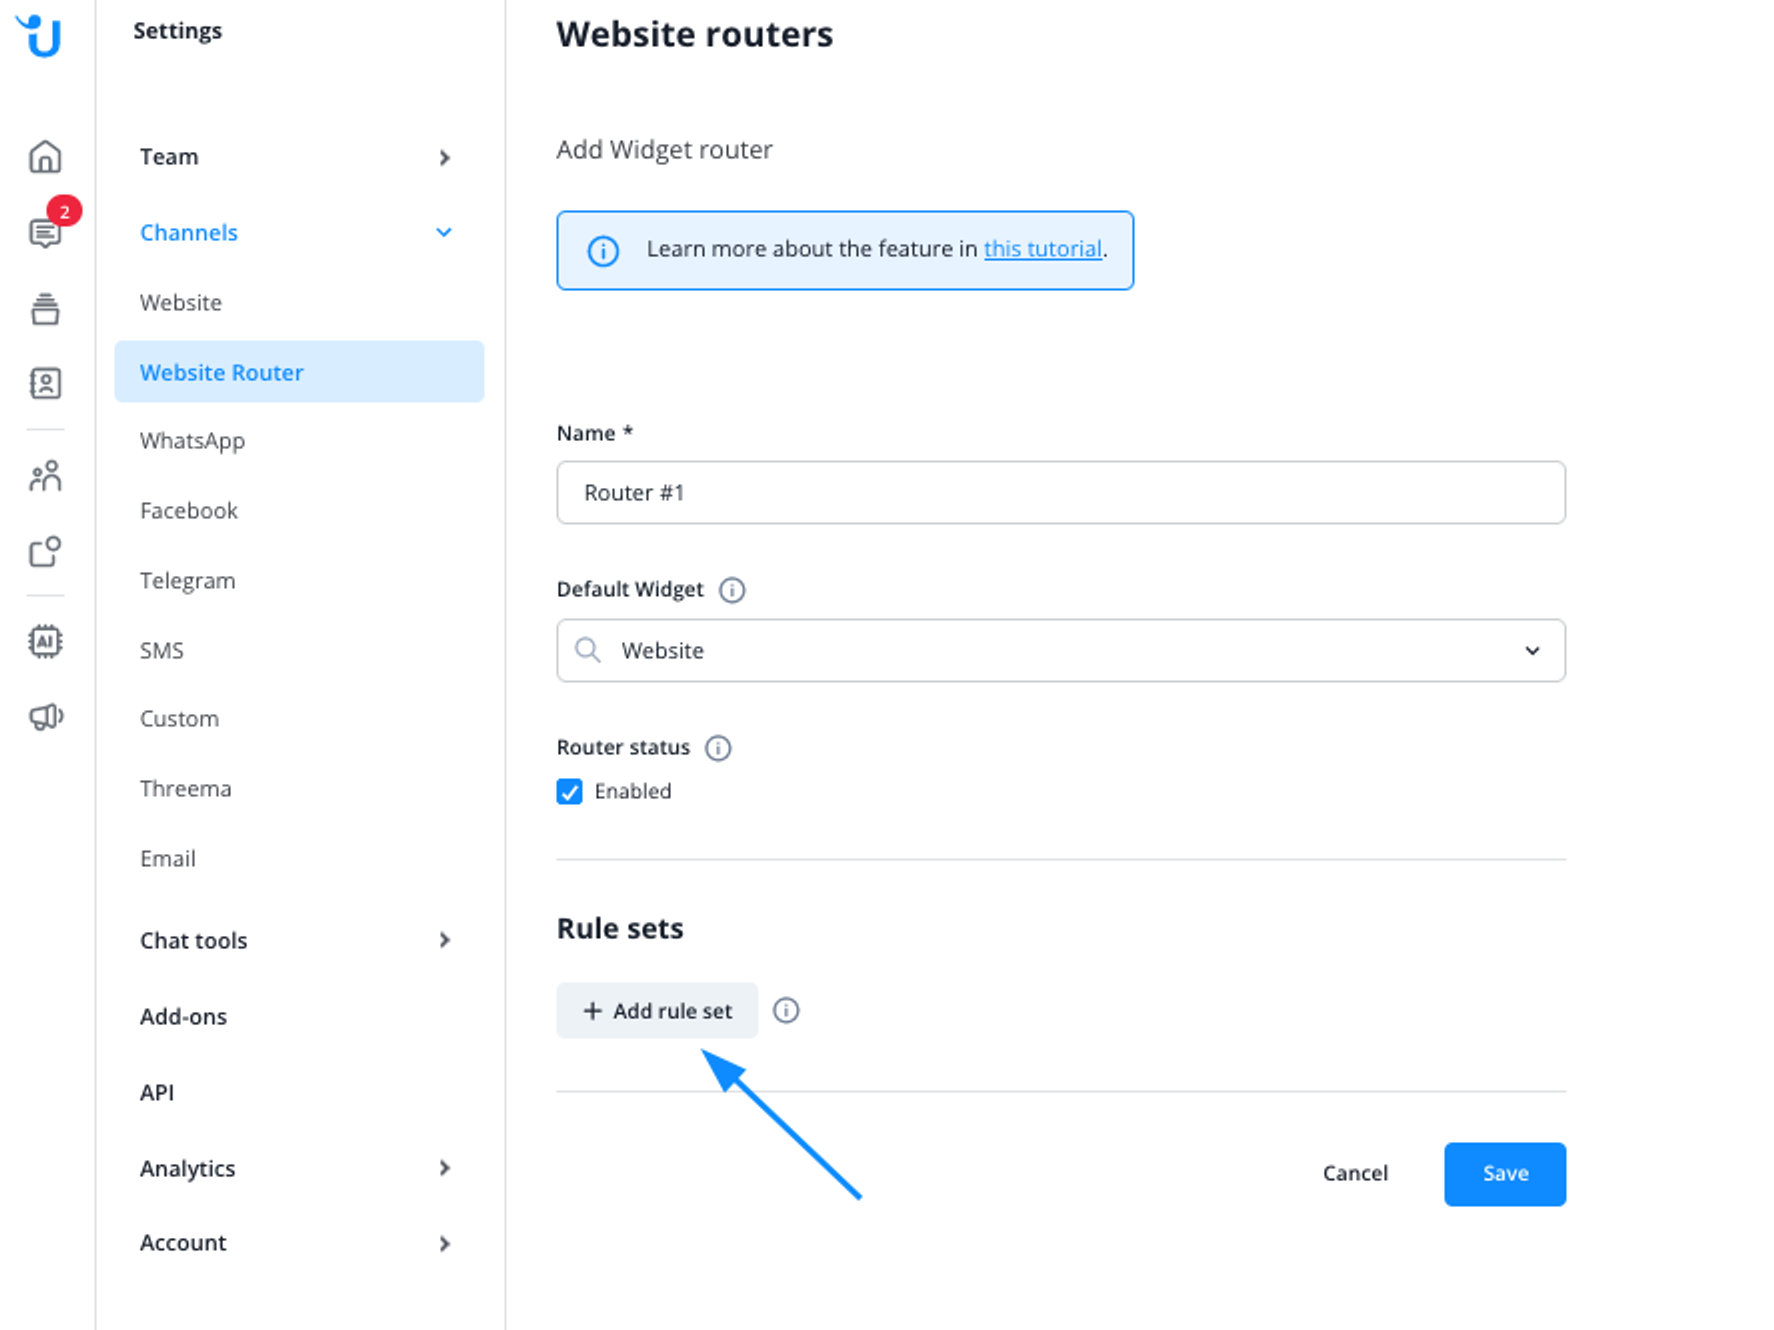
A new Widget router requires at least a name. It’s enabled by default and has the default Widget selected. Since using a Widget router without a rule set is just like using a regular Widget, let’s add a rule set:
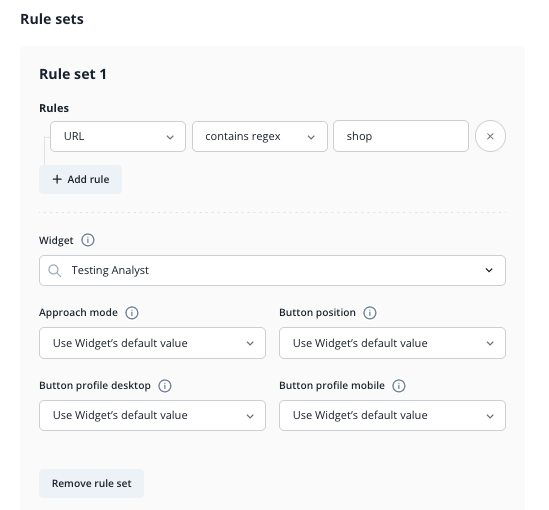
We created a new rule set and edited its first rule. This rule matches if the URL the contact is visiting when starting the chat contains the string “shop”, between slashes. When the rule set matches, it selects a different Widget than the default Widget, in this case the “Testing Analyst” Widget. Through the fields below you can even override some of the “Testing Analyst” Widget’s settings.
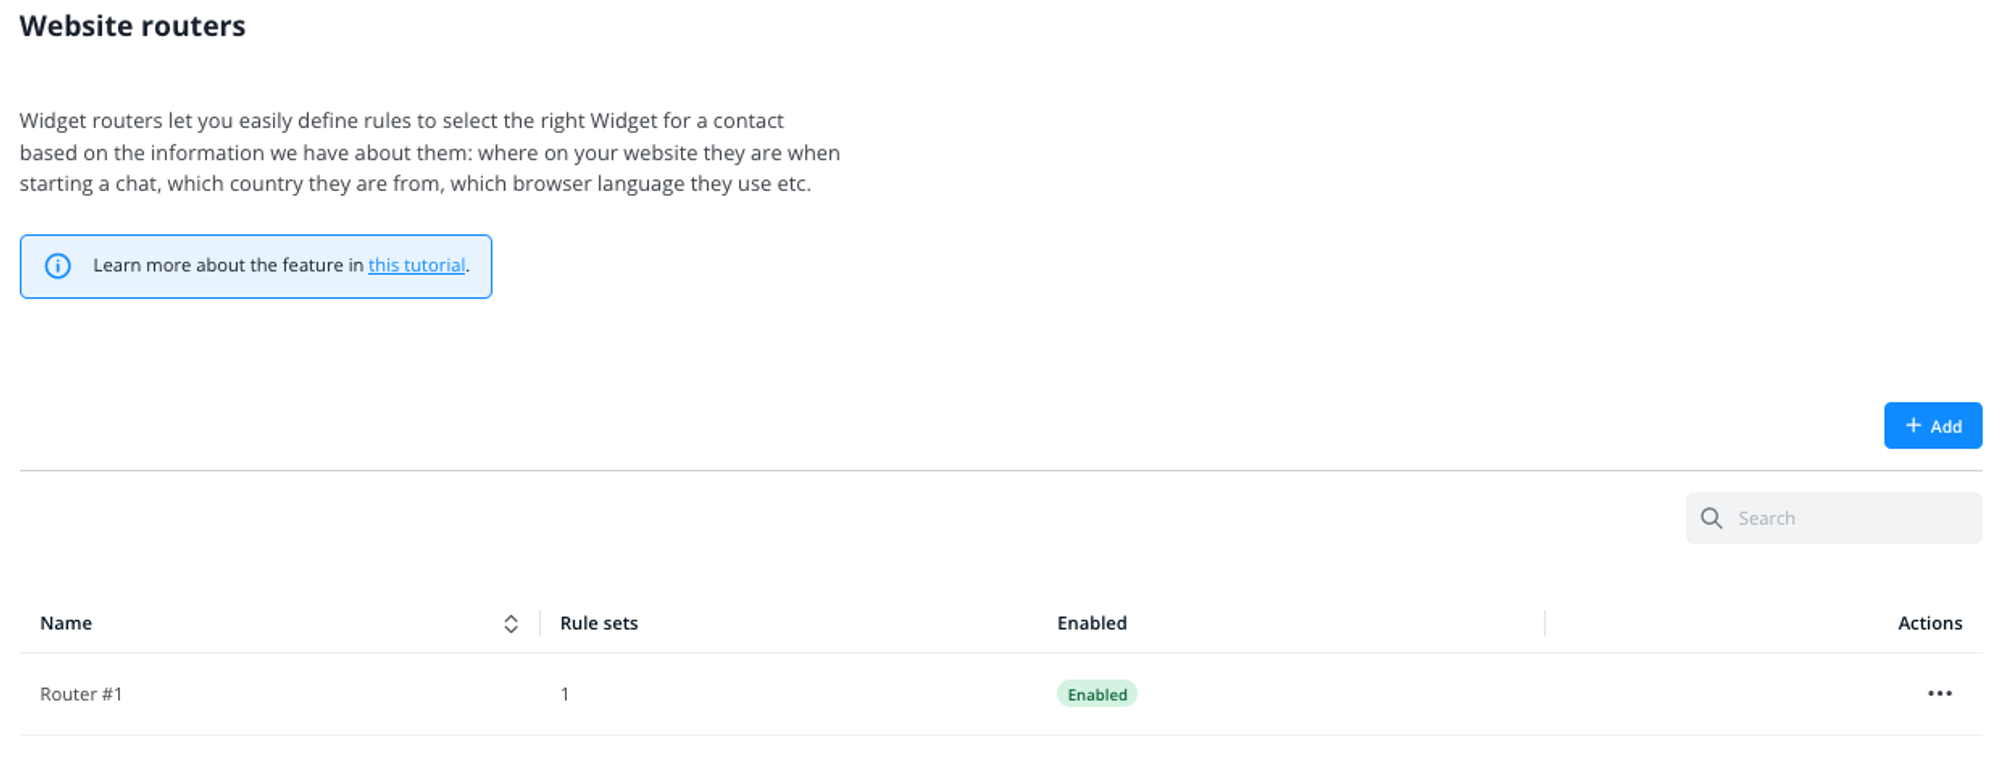
Once you click Create Widget router, you are back to the Widget router overview. Here your newly created Router now appears along with its numbers of rule sets and its current status:
This simple Widget router already allows you to use a dedicated Widget for contacts that start a chat from your webshop, with dedicated support staff that’s best-suited to answer their questions. Now you can create more rule sets for this Widget router, or create more Routers.
Multiple simple routers vs. few complex routers
Whether you want to create multiple simple Widget routers with simple rule sets or a few complex Widget routers with many elaborate rule sets is mostly a matter of taste.
Using few complex Widget routers allows you to manage your Widgets from few configuration items and they’re faster to integrate. But overly complex Routers can be hard to understand, which may lead to unwanted behavior.
Multiple simple Widget routers require more integration work up front since each Router has to be manually integrated into your website (see Integration section below). Once integrated, however, they can be easier to understand and maintain.
Please note: You can only implement one Widget router per HTML page, so if you use multiple Widget routers you have to ensure that each is loaded at the correct location.
More on rules set
For each rule set you define a Widget that is used if all rules match - or choose to display no Widget in this case.
If a Widget router has multiple rule sets, these will be evaluated in a “short-circuit” logic: the rule sets (i.e. its rules) are tested sequentially and the first one with all rules matching “wins” – its Widget gets selected.
In addition to picking a Widget, a rule set can also override the following configuration settings of that Widget:
Setting | Description |
Approach mode | Changes the Widget’s default approach mode, e.g. make contact registration mandatory when this rule set matches |
Button position | Changes the Widget’s default button position, e.g. show it on the left side when this rule set matches |
Button profile desktop | Changes how prominently the Widget’s button is displayed for desktop visitors when this rule set matches |
Button profile mobile | Changes how prominently the Widget’s button is displayed for mobile visitors when this rule set matches |
More on single rules
Each rule set can consist of multiple rules but must contain at least one. If you create more than one rule for a rule set, all of them have to match in order for the rule set to match. Currently you can create the following rules:
Filter | Operator | Value | Description |
URL | is | free text input | Matches if the contact’s URL is exactly the string you provided |
URL | contains regex | free text input | Matches if the contact’s URL contains the regular expression you provided |
User agent | contains regex | free text input | Matches if the contact’s user agent string contains the regular expression you provided |
Geolocation | is | value from drop-down | Matches if the contact’s IP address resolves to the selected country (or continent) |
Language | is | value from drop-down | Matches if the contact’s derived language preference equals the selected language |
Device | is | value from drop-down | Matches if the contact’s browser falls into the selected category (desktop vs. mobile) |
Please note: While we do basic syntactic validation for each rule (e.g. whether the provided string is a valid regular expression), you are responsible for building semantically valid rule sets where individual rules do not exclude each other.
For example, if you create a rule set with two rules where the first one requires the contact’s country to be “Germany” while the second rule only matches if the country is “Austria”, the rule set as a whole can never match. The Widget router then falls back to the configured default Widget.
We will show more prototypical Widget router rule set configurations in the example section below.
Integration
Integrating a Widget router into your website works the same way as integrating a regular Widget: you simply add one line to your website’s HTML templates, which will then load the Widget router’s JavaScript code.
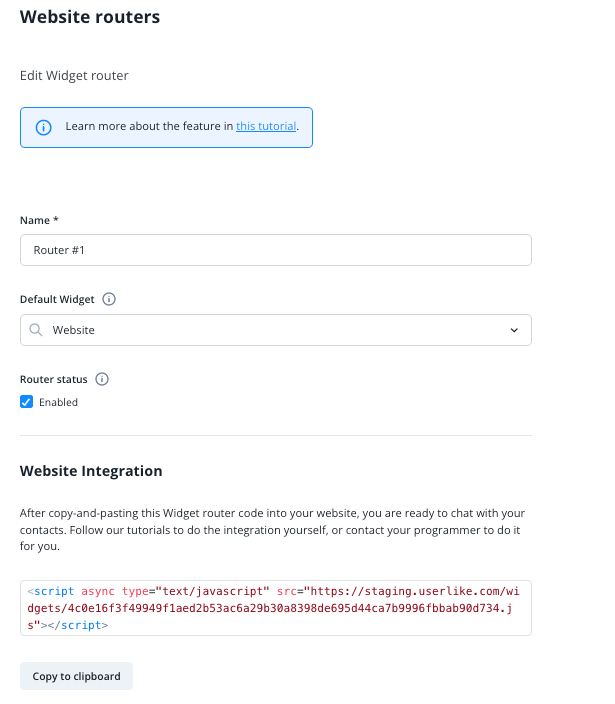
For each of your Widget routers we provide the respective HTML snippet, ready for you to copy and integrate it yourself or to send it to your technical staff. In the Widget router overview, edit the Widget router you want to integrate.
There you’ll find the JavaScript code snippet:
Integrating the code yourself
Paste the code into the bottom of your website, just before the closing </body> tag. Save your modified website and upload it to your web server. Congratulations, you are done!
We strongly advise you to place the script within the body tag of the website. If you include the script in the header of the page, it will not work properly on Internet Explorer due to undefined loading behavior of the chat client.
Due to the JavaScript sandbox restriction you cannot view the file via the local file:// protocol and run the script. If you want to test the Widget on a local file, run it using a local web server.

Sample Widget routers
Here are some sample Widget routers to show you possible use cases and configurations that fit them.
Load widgets based on contact language
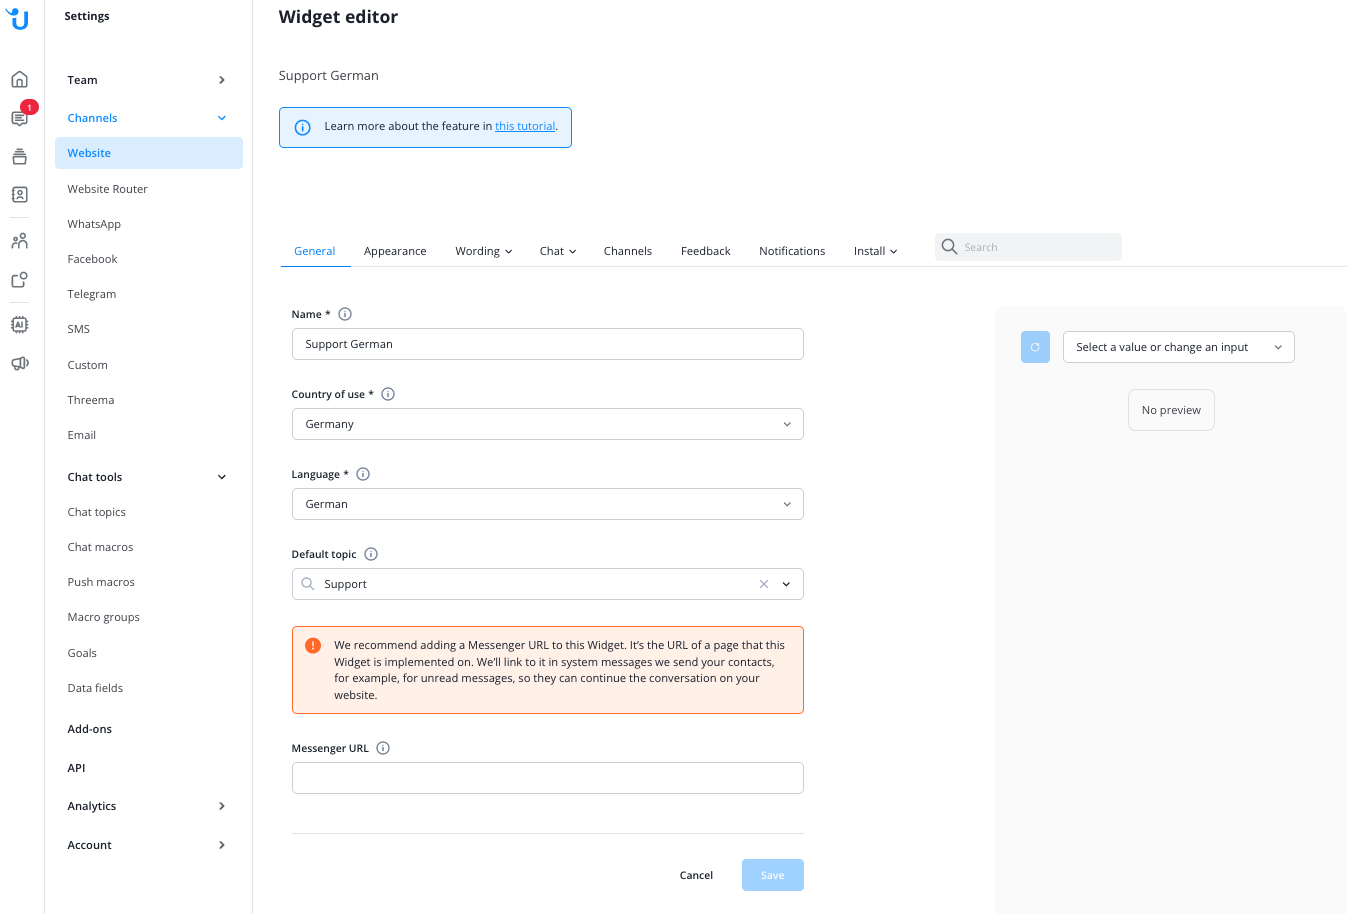
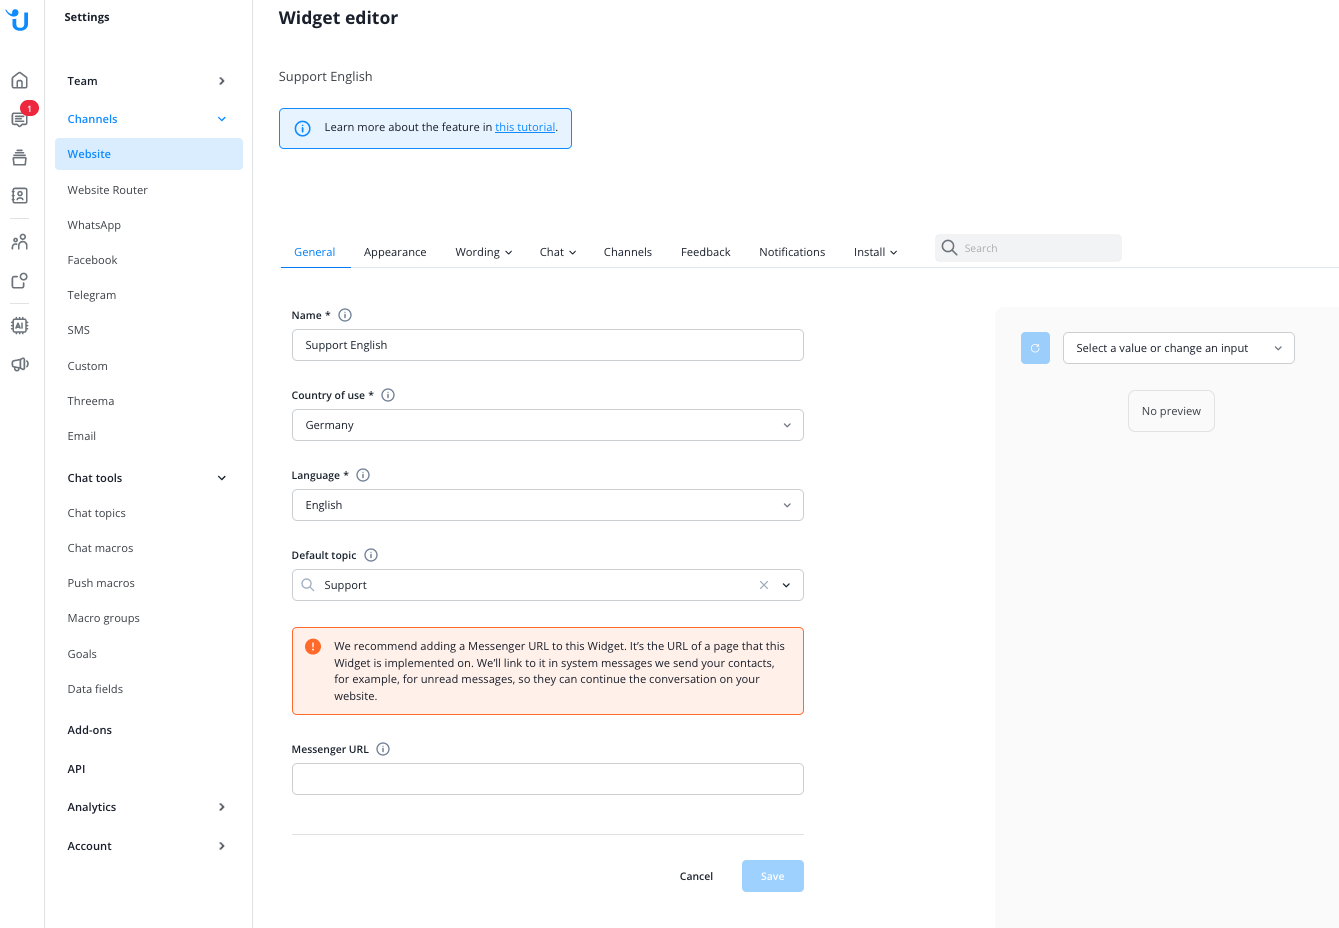
You have a website with an international target audience, and your staff is able to offer customer support in three different languages: German, Spanish and English.
First create a localized Widget for each language like the ones below:
Then create a Widget router with the following configuration:
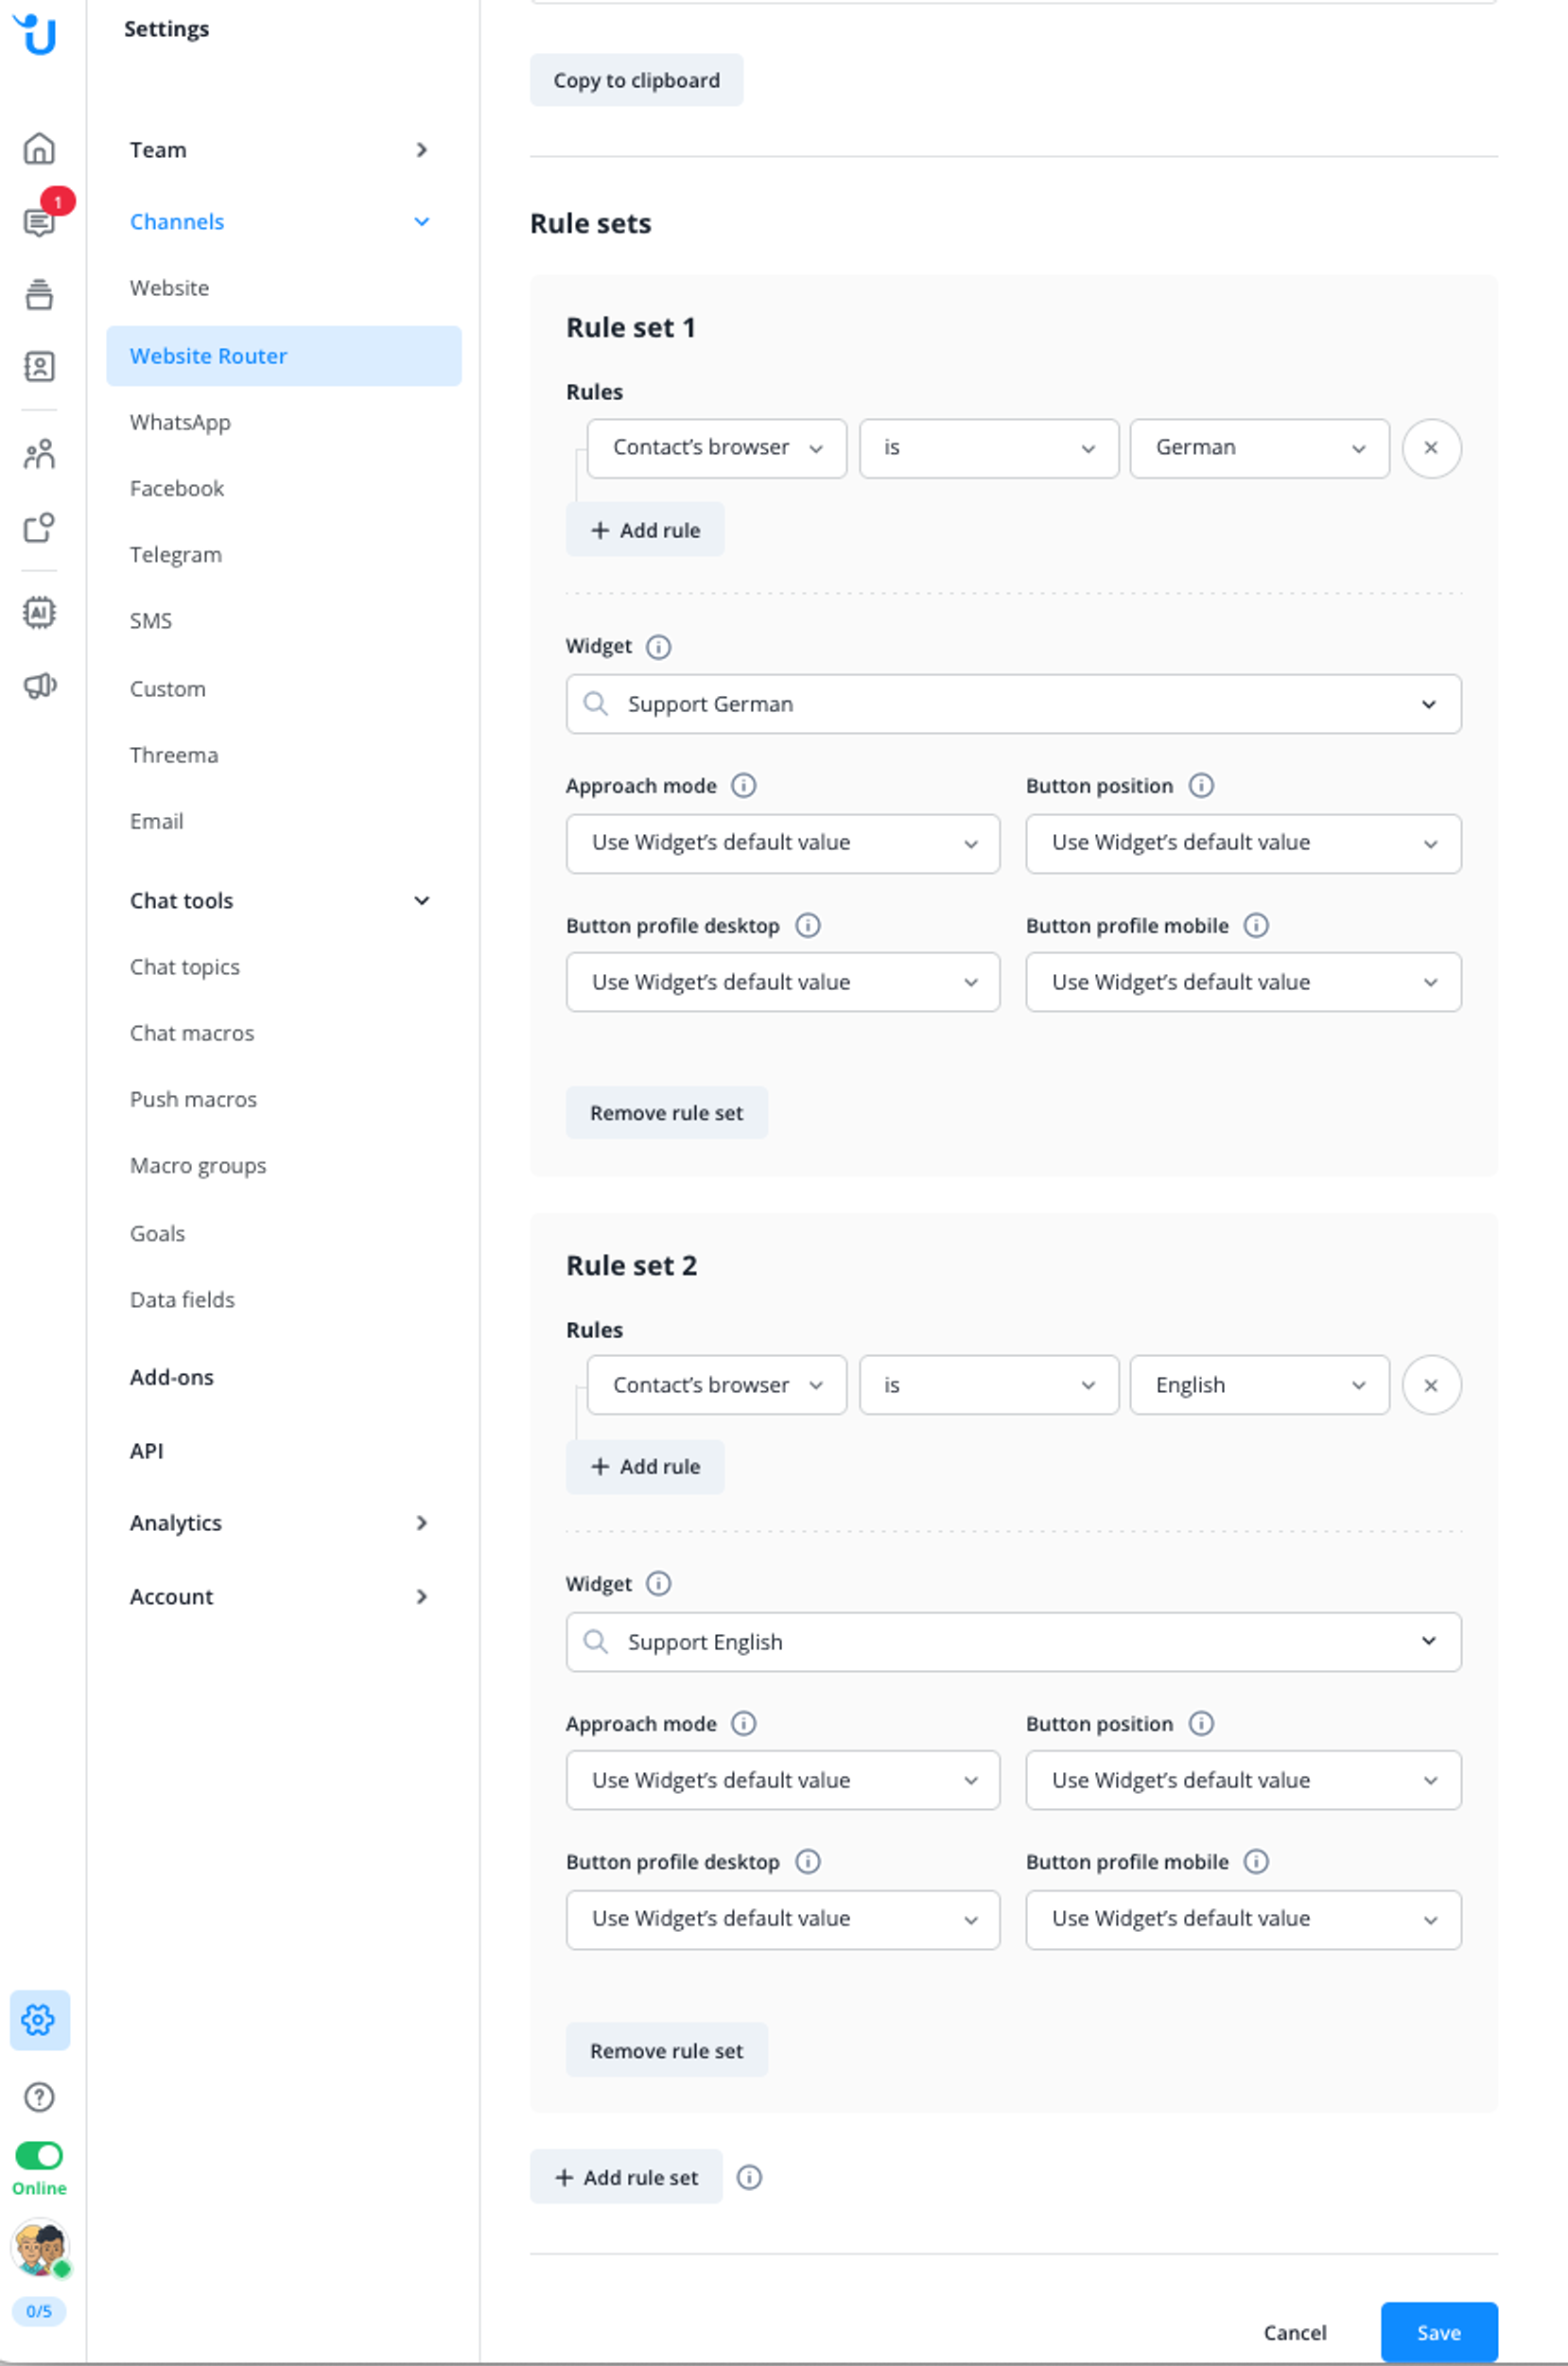
First, this Widget router checks if the contact’s browser language settings indicate support for any German locale. If yes, it loads the Widget “Support German”.
Then it checks if the contact’s browser language settings indicate support for any English locale. If yes, it loads the Widget “Support English”. In all other cases it falls back to the default Widget “Support”.
Things to consider when matching for languages
Most web browsers let you configure more than one language. Our language-based rules only try to match the primary language. Also regional variations are currently ignored, so a rule for Portuguese matches Brazilian and European Portuguese.
Also, it’s good practise to set your default Widget to a language the majority of your contacts likely understands. This way, if none of the more specific language rules match, you will safely fall back to your “main” language version.
Override widget configurations based on website URL
You want to use a different approach mode depending on which section of your webshop your contacts are browsing. In general, you want to proactively initiate a chat after a certain time and offer support to potential customers. Only on your FAQ page, you want contacts to initiate the chat.
You configure your default Widget to use a proactive approach mode:
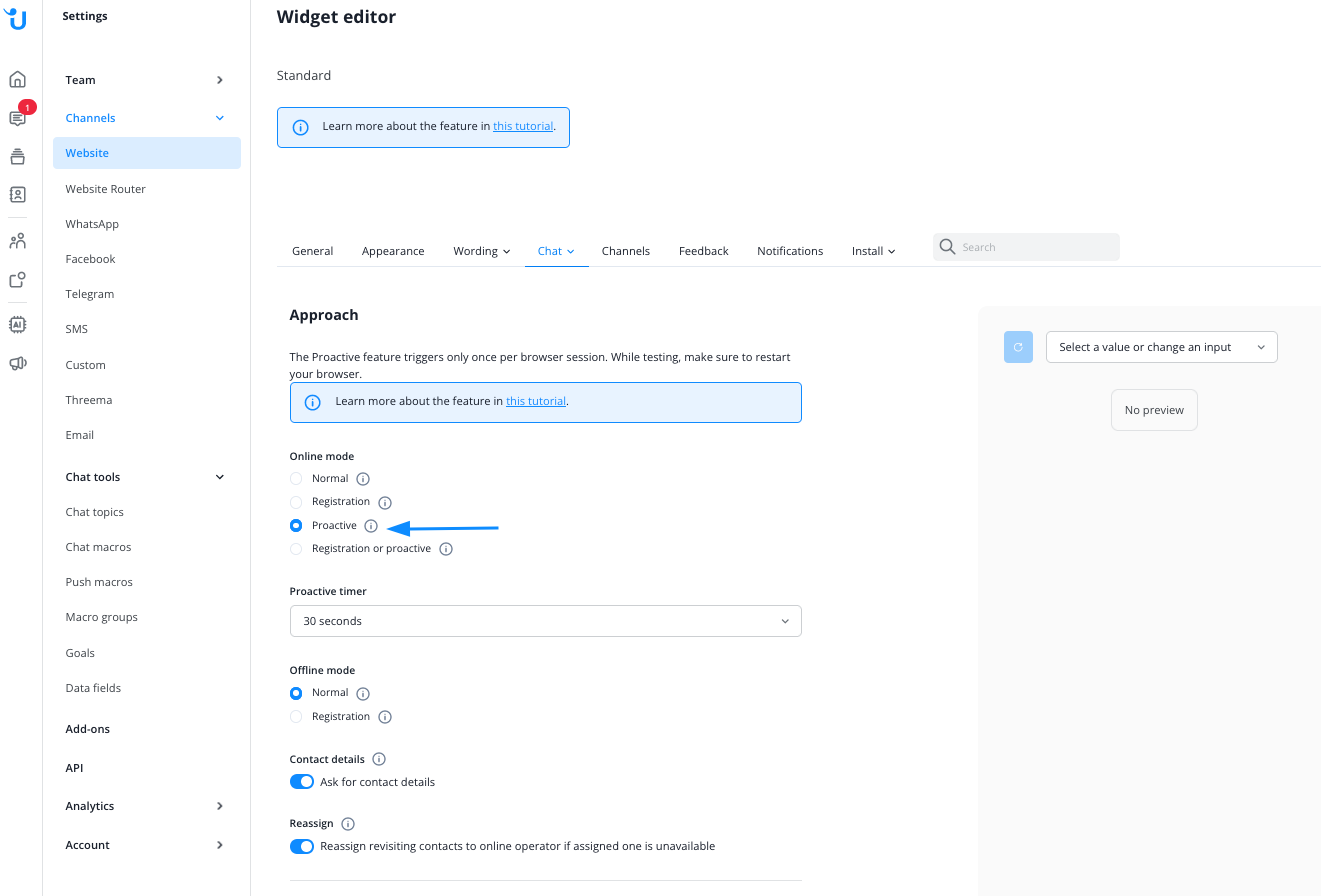
Then, to use the same Widget with a different approach mode when the contact browses your FAQs, create a Widget router with the following configuration:
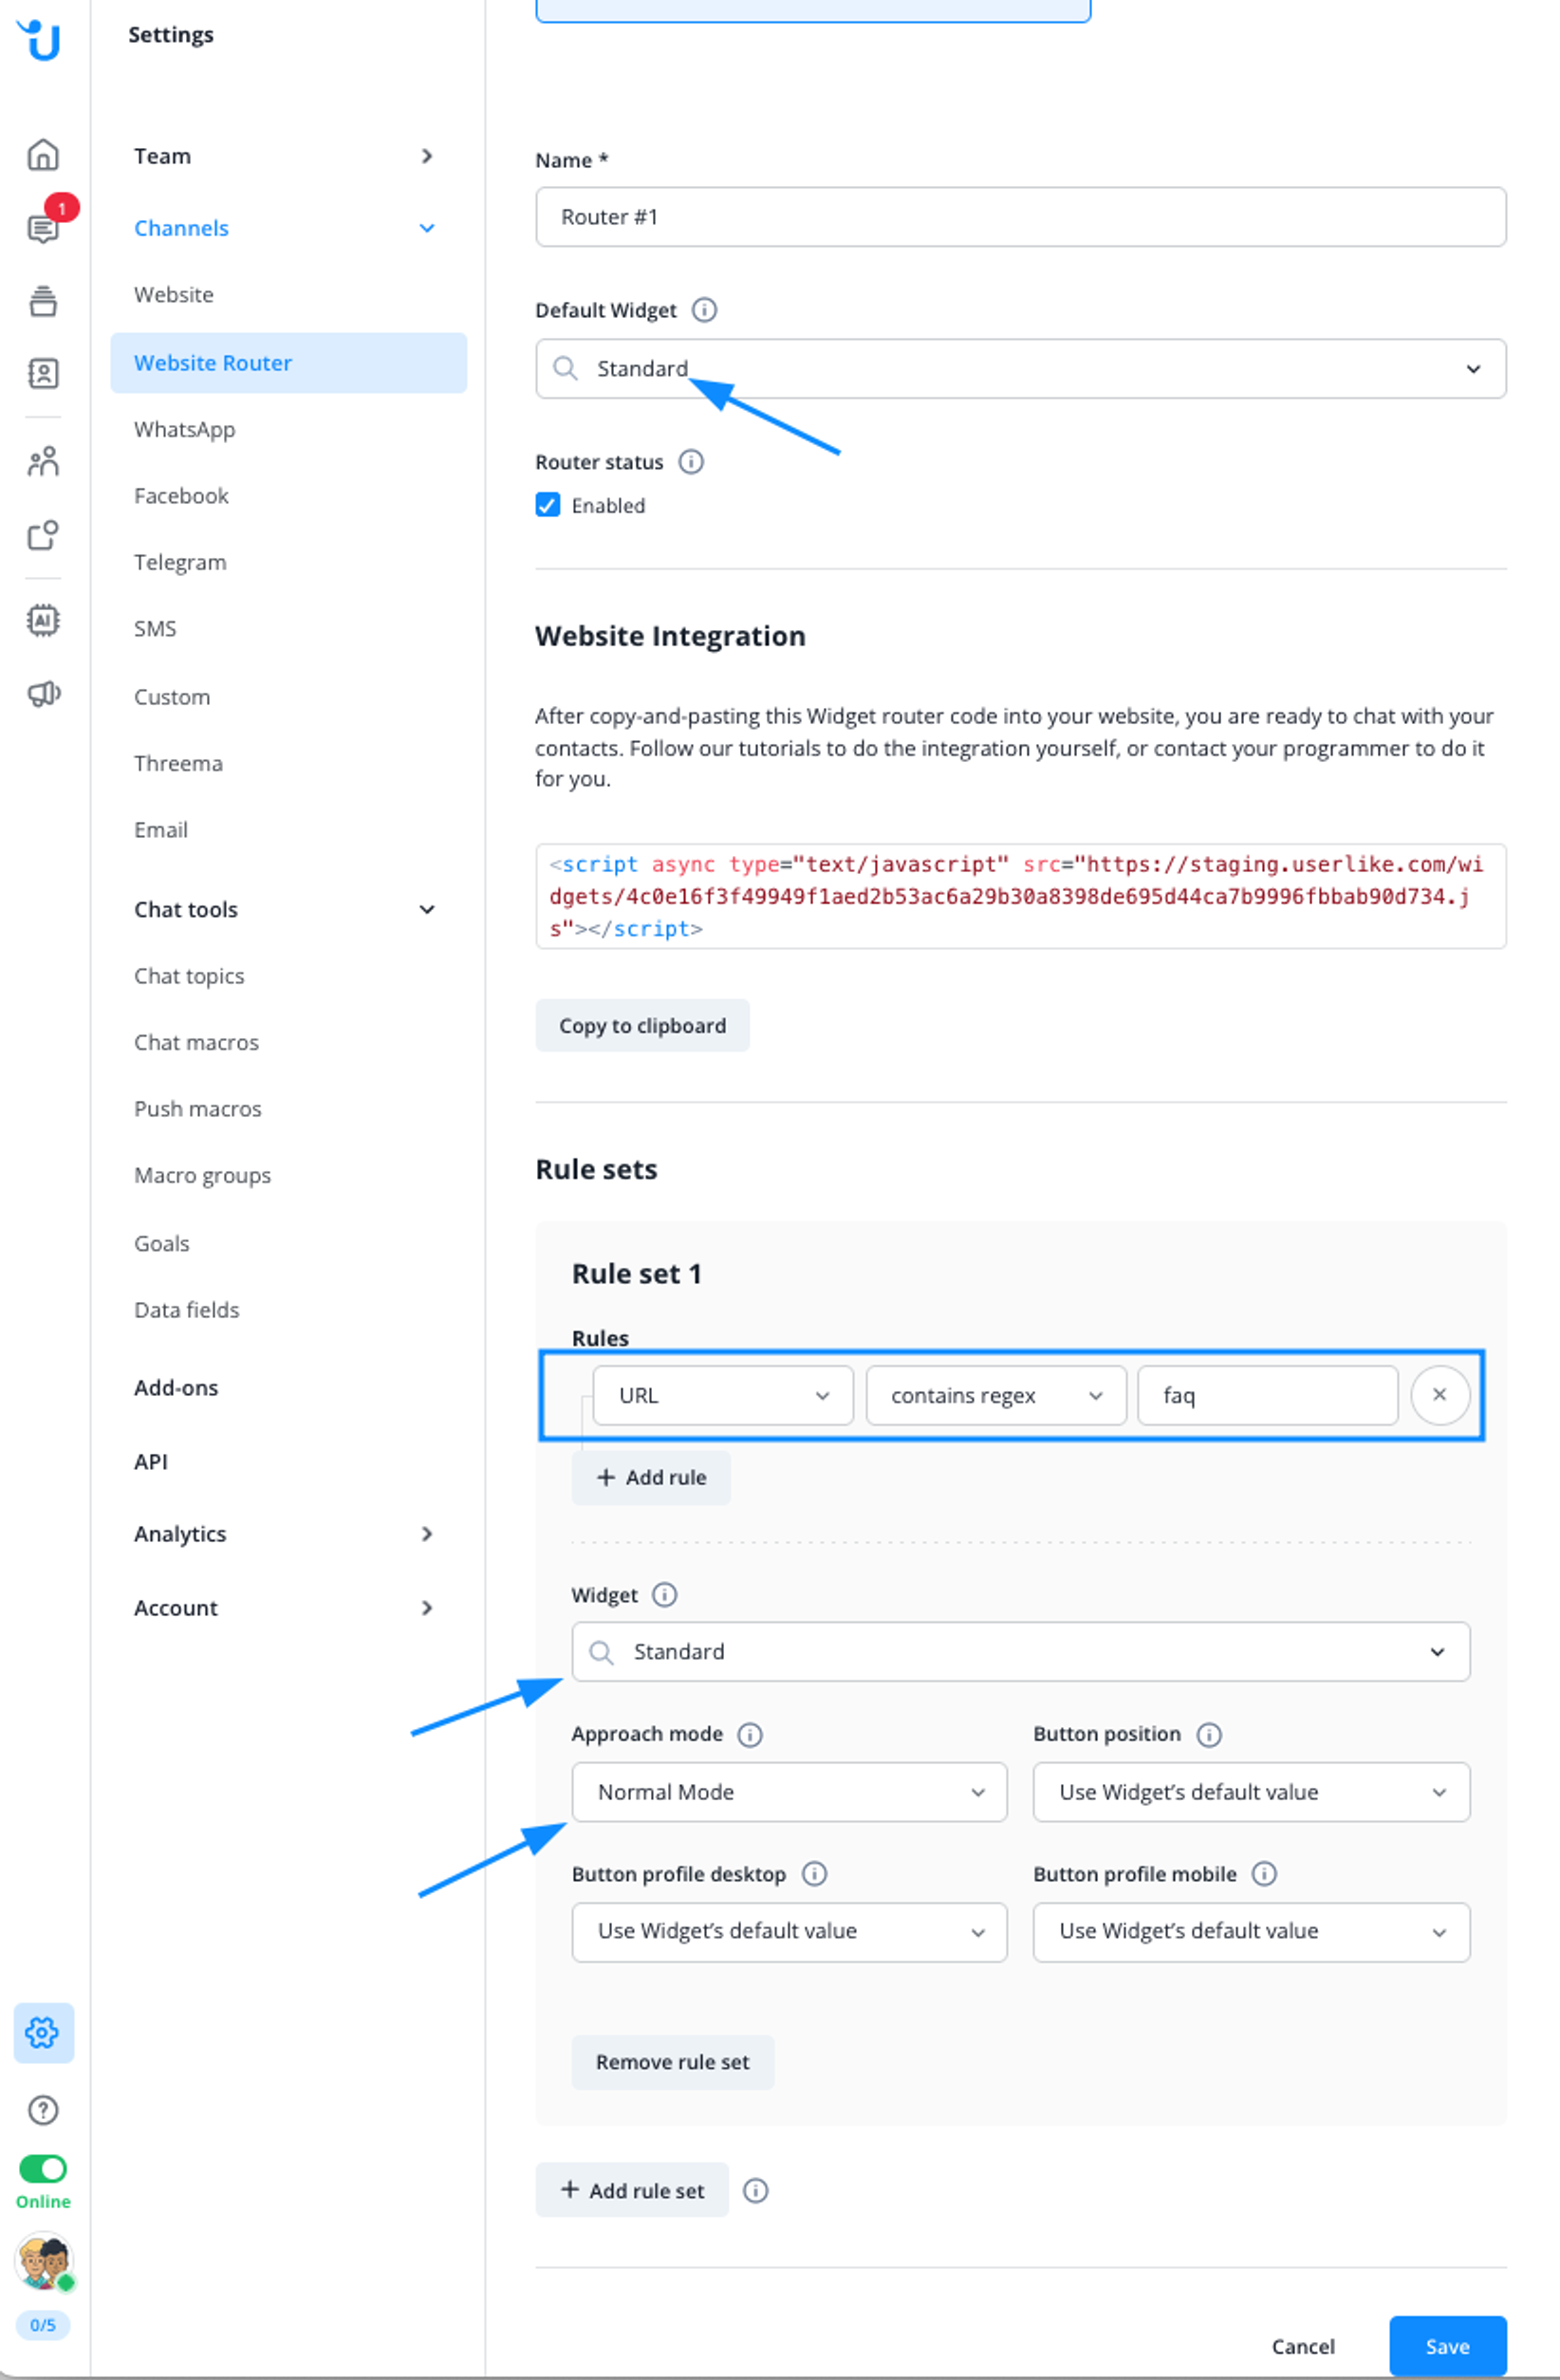
This Widget router checks if the contact is currently visiting your FAQ section. If yes, it loads the “Standard” Widget but sets it to Normal Mode.
In all other cases and all non-FAQ pages, it also loads the “Standard” Widget but uses its default approach mode - proactively starting a chat after 10 seconds.
Load different widgerts depending on geolocation
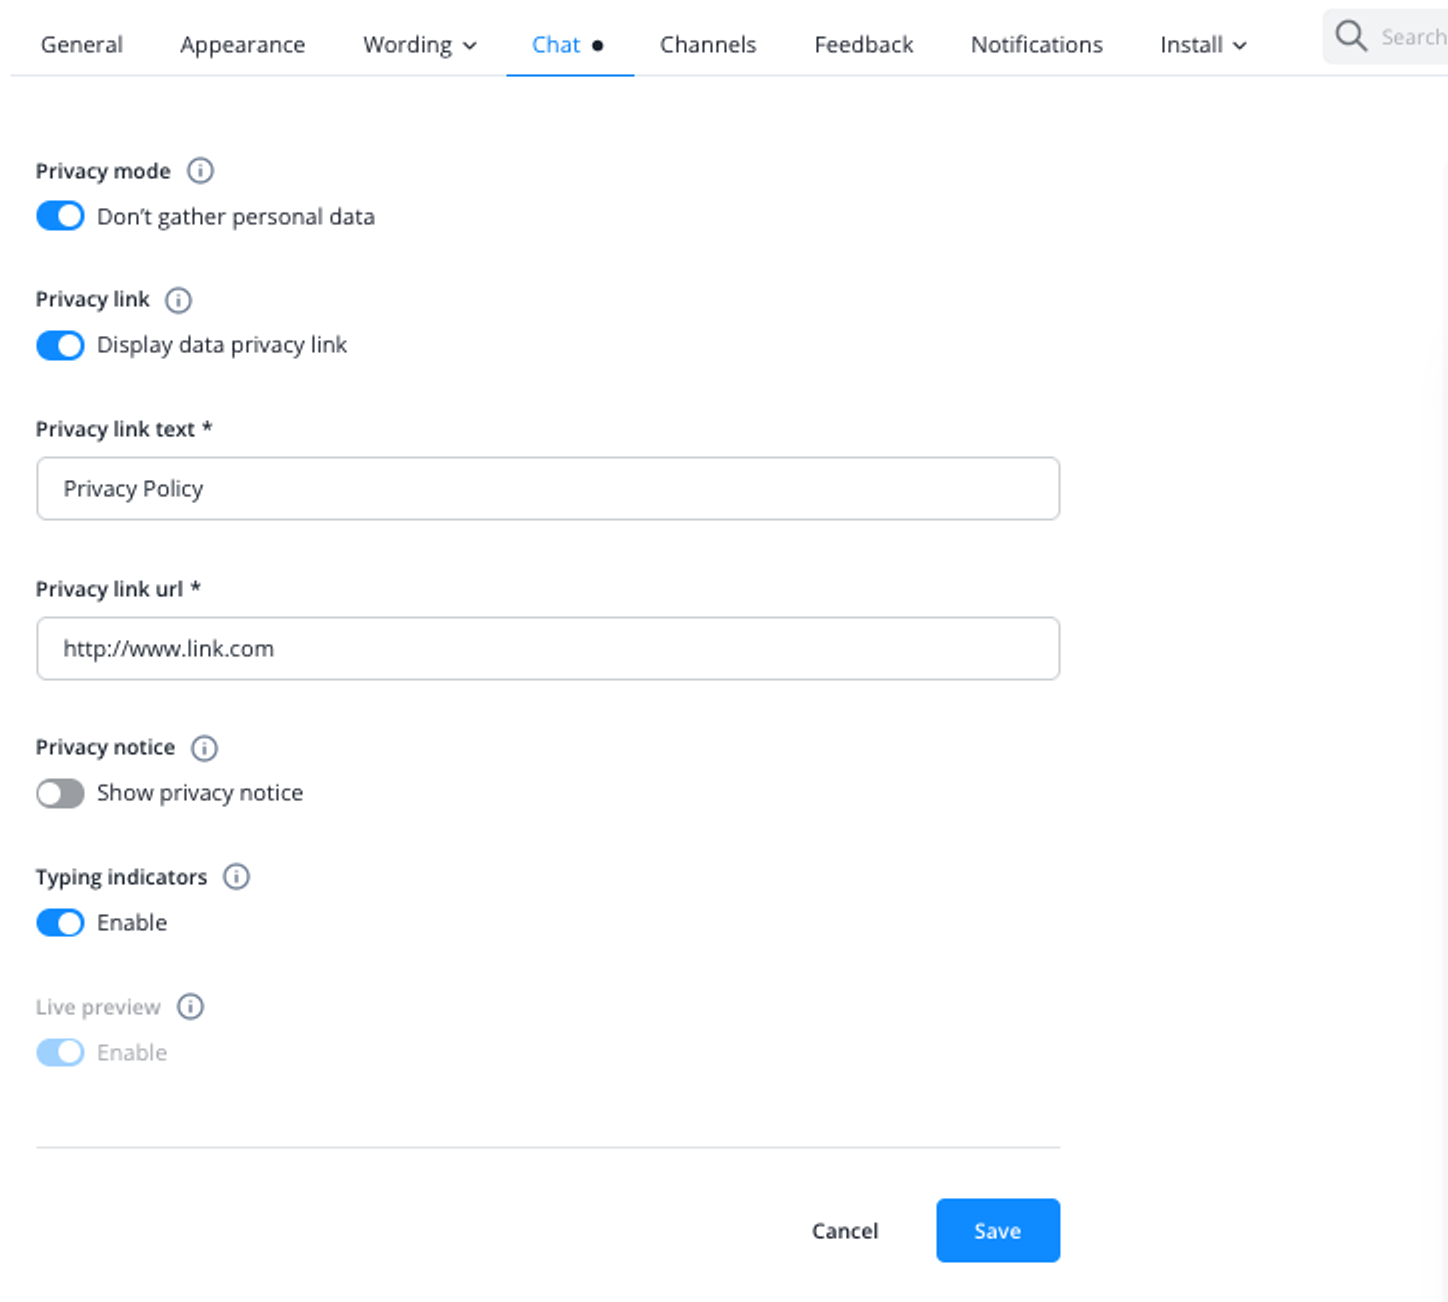
Due to different legal requirements, you want to use Widgets with different privacy settings depending on your contact’s geolocation.
In a Widget’s settings, you configure it to have a more restrictive Privacy Mode:
Then create a Widget router with the following configuration:
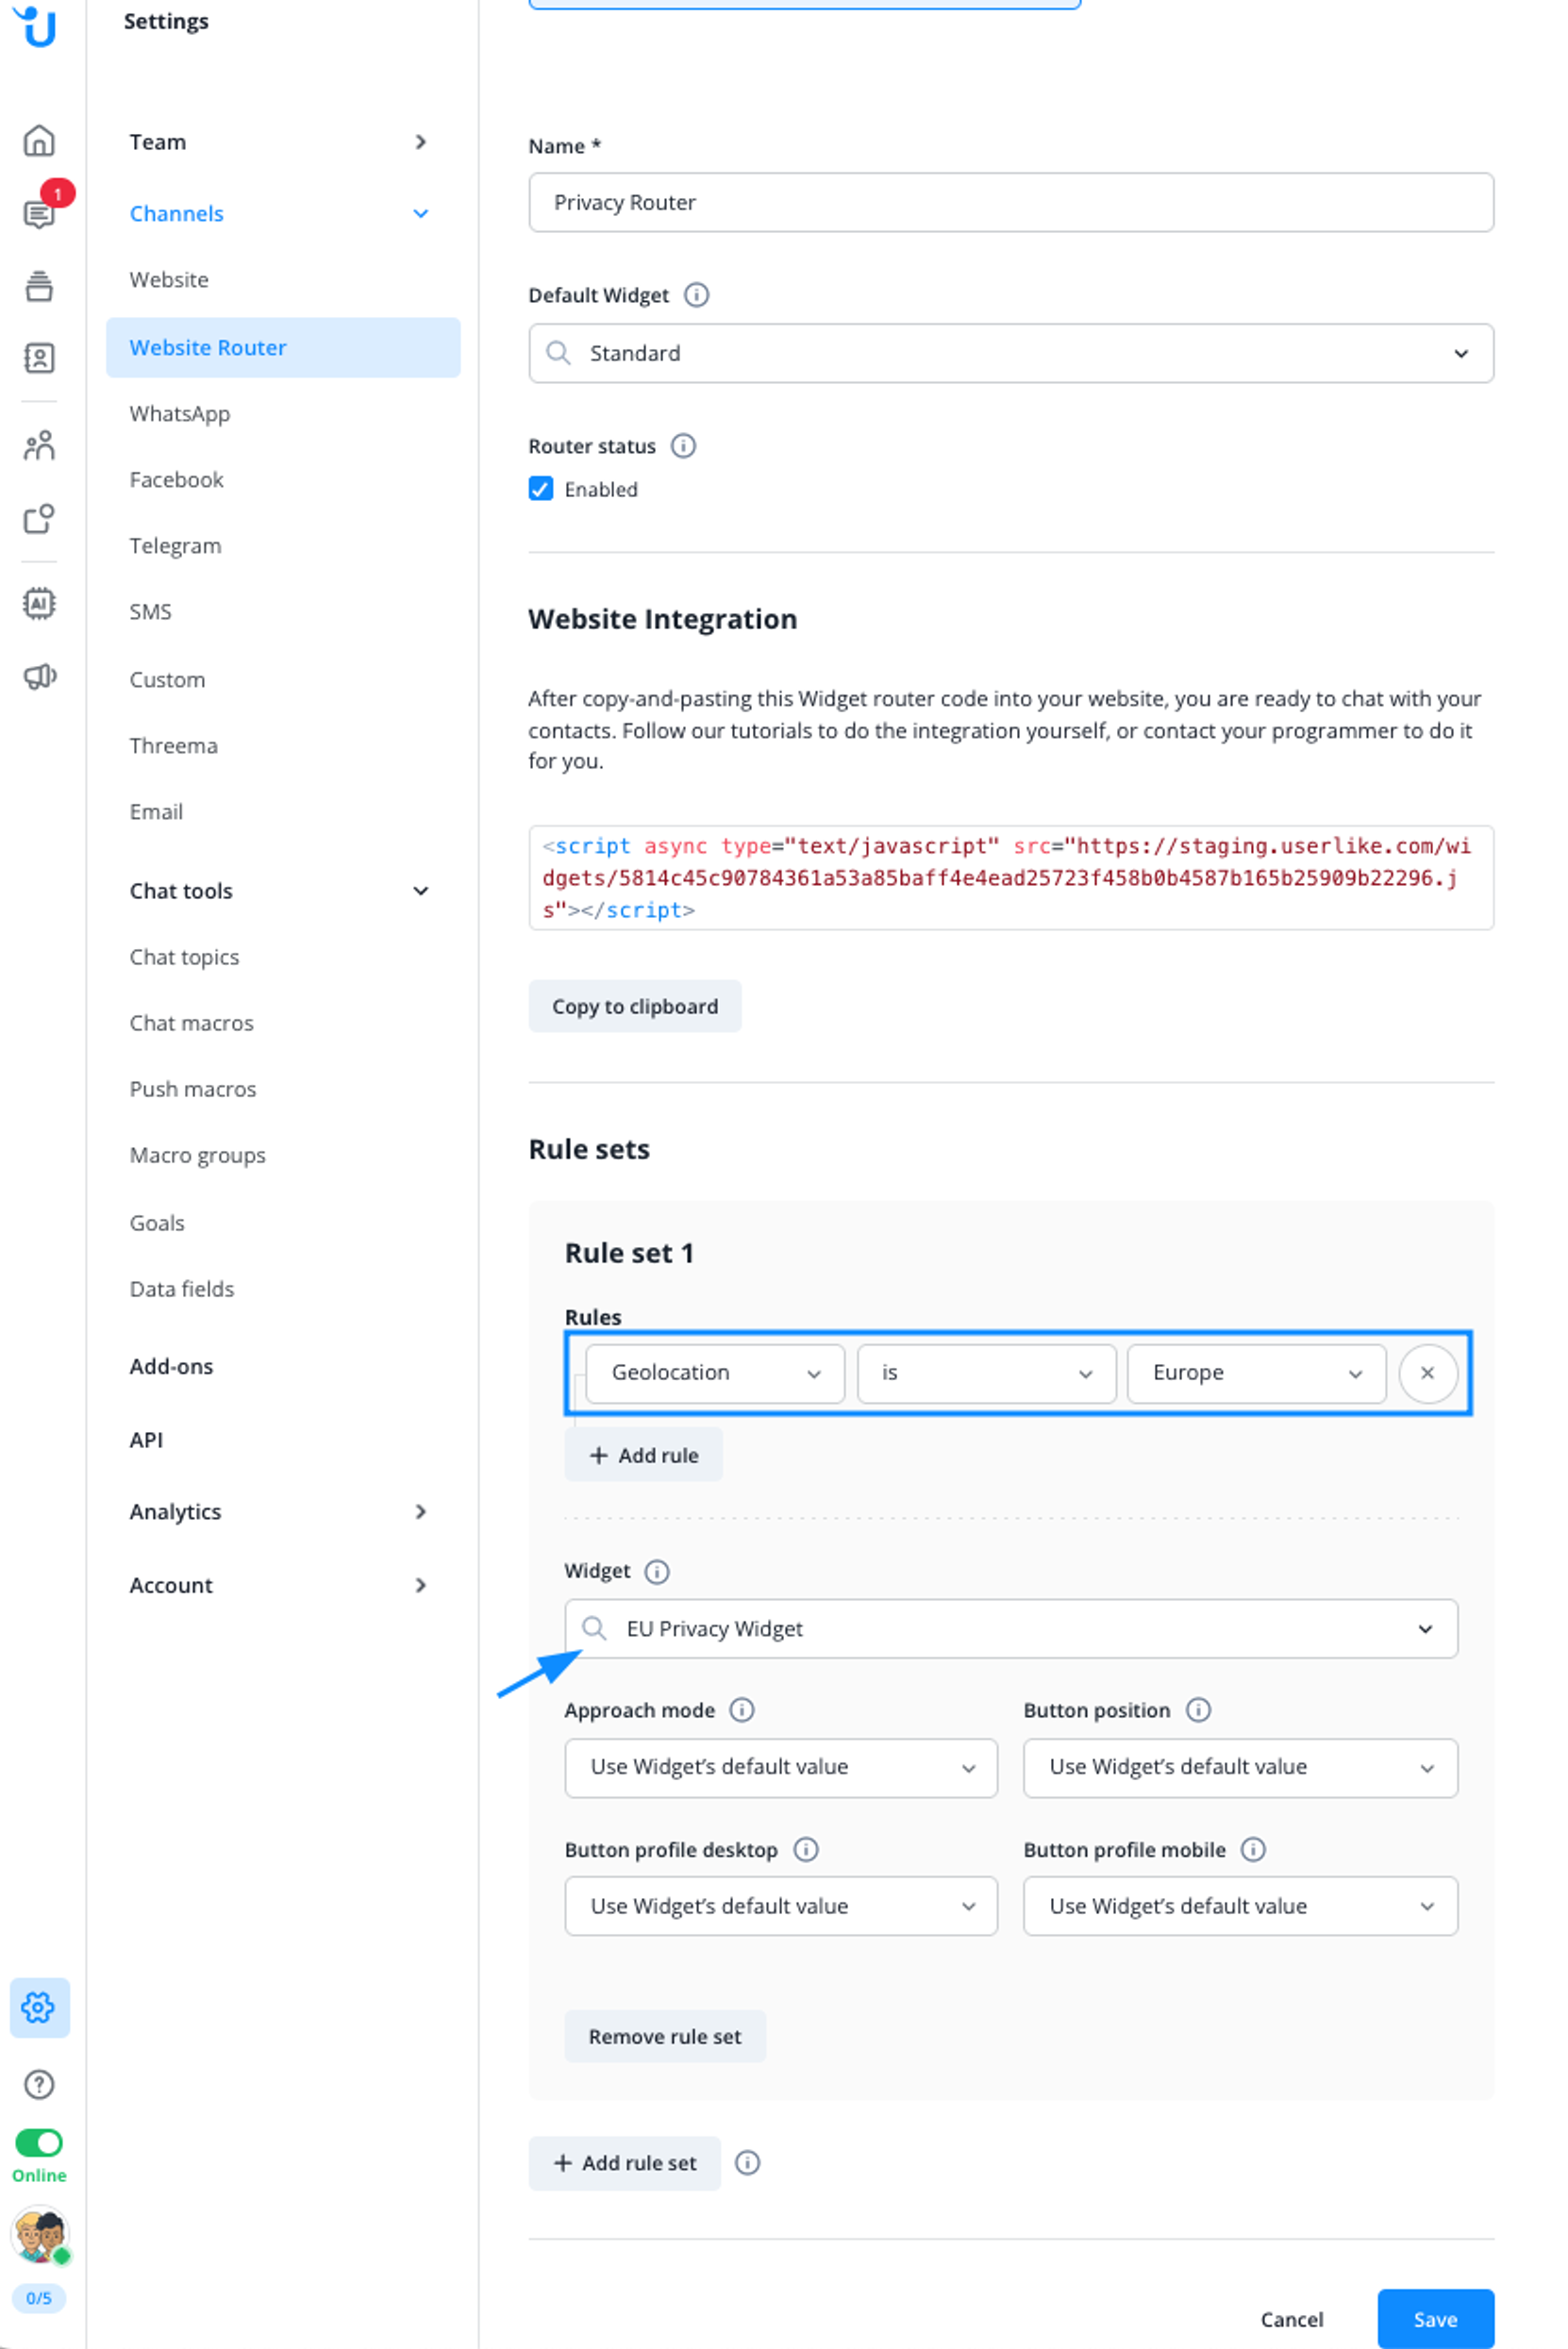
This Widget router checks if your current contact is based in Europe. If yes, it will load the “EU privacy Widget”, with its more restrictive settings. In all other cases it will load the default Widget.