In the Widget Editor, you set up the behavior, wording, and design of your Widget. Define how you connect with your contacts and adapt Userlike to your business processes, corporate identity, and local data privacy regulations.
You reach the Widget Editor from the Dashboard via Channels Website and clicking a Widget’s name.
General
Here you find your Widget’s most basic properties – its name, language, default topic and Messenger URL.
- Give the Widget a name to distinguish it from your other Widgets.
- Adjust the language of your Widget to tailor it to different audiences.
- Select your Widget’s default topic to tag all conversations conducted on it accordingly.
- Enter the URL of a page that your Widget is implemented on. We’ll use it in system messages sent to your contacts, such as unread messages and conversation transcripts, to verify their identity to quickly get them back in the conversation. It is needed if you want to communicate in an asynchronous way with your customers.
Appearance
Here you define how your Widget and chat button look on your site, their style, color, and position. In the preview to the right you’ll see the effect of your changes. Click the button to open the different views.
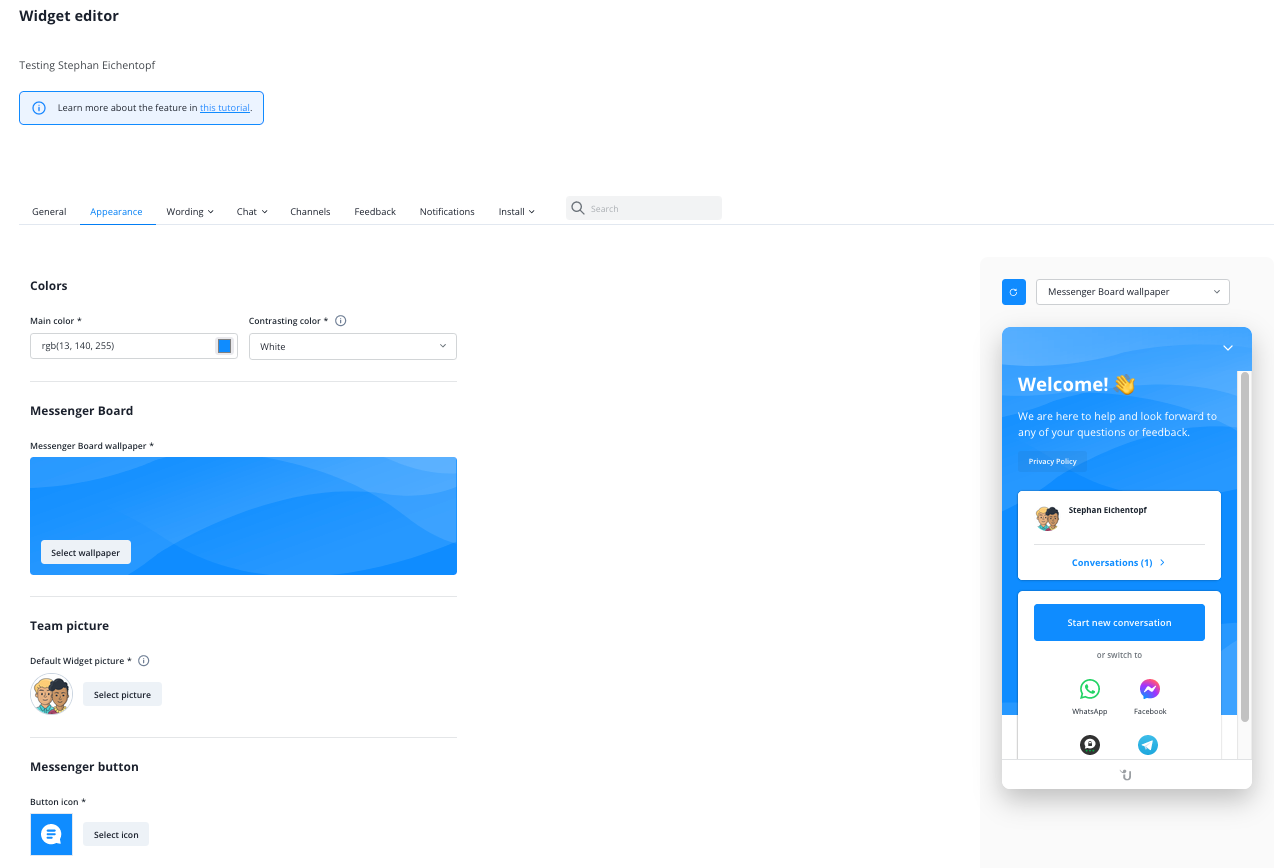
- Set your Website Messenger’s main and contrasting color. The main color appears as background of buttons, the Messenger Board and the Messenger’s header area. The contrasting color applies to texts and navigation symbols in all areas where the main color is used. To ensure good visibility, use white on a darker main color and black on a lighter main color.
- Add a design with graphical shapes to the home screen of your Website Messenger for a more modern look. Your main color remains in place. You can disable the Messenger Board under Chat > Behavior.
- Select a default operator picture that is displayed to your contacts when no operator is available. It appears in the conversation view and on the Widget, depending on your appearance settings.
- Pick an icon and shape for your messenger button.
- Choose a button profile to define how prominently the chat button should be displayed for desktop or mobile visitors on your website.
- Control the chat button’s lateral alignment by toggling its position and offset.
- (Available from our Flex plan) Add a custom font by providing the URL of a CSS file that defines the font and the name of the font family as specified in the file. The font will be used for all text in your Website Messenger. Alternatively, you can use system fonts, which improve the Widget’s loading speed.
more information on custom font integration
Button profiles
Our button profiles allow you to define how pronounced the Website Messenger appears to visitors on your desktop and mobile site. The profiles feature different combination of settings, making them range from less to more pronounced in this order: “Silent”, “Low”, “Medium”, “Full”. Here’s what each of them does:
- Notifications in page title: Displays notifications for new messages in the page title when the tab containing the Website Messenger is not focused by the contact.
- Unread message counter and preview: If the Messenger is minimized, a little counter on the messenger button notifies contacts about unread messages and a bubble shows a preview of the last operator message.
- Proactive Mode (if enabled): “Off” means that the proactive mode is suppressed, even if it’s enabled under Chat > Behavior > Approach. “On” means it works as expected.
- Welcome bubble pop-up: The welcome bubble message you defined under Wording > Conversation > Automated messages appears in a bubble above the messenger button. Depending on the profile, this happens when the contact hovers the mouse cursor over the button or automatically after a few seconds. Once the contact has closed the bubble, it will not appear again until the website is closed. Please note that the proactive message replaces the welcome bubble message when Proactive Mode is active and not suppressed.
An overview of the settings of each button profile:
Button profile / Setting | Silent | Low | Medium | Full |
Notifications in page title | Off | Off | On | On |
Unread message counter and preview | Off | On | On | On |
Proactive Mode (if enabled) | Off | Off | On | On |
Welcome bubble pop-up | On hover | On hover | On hover | Automatically |
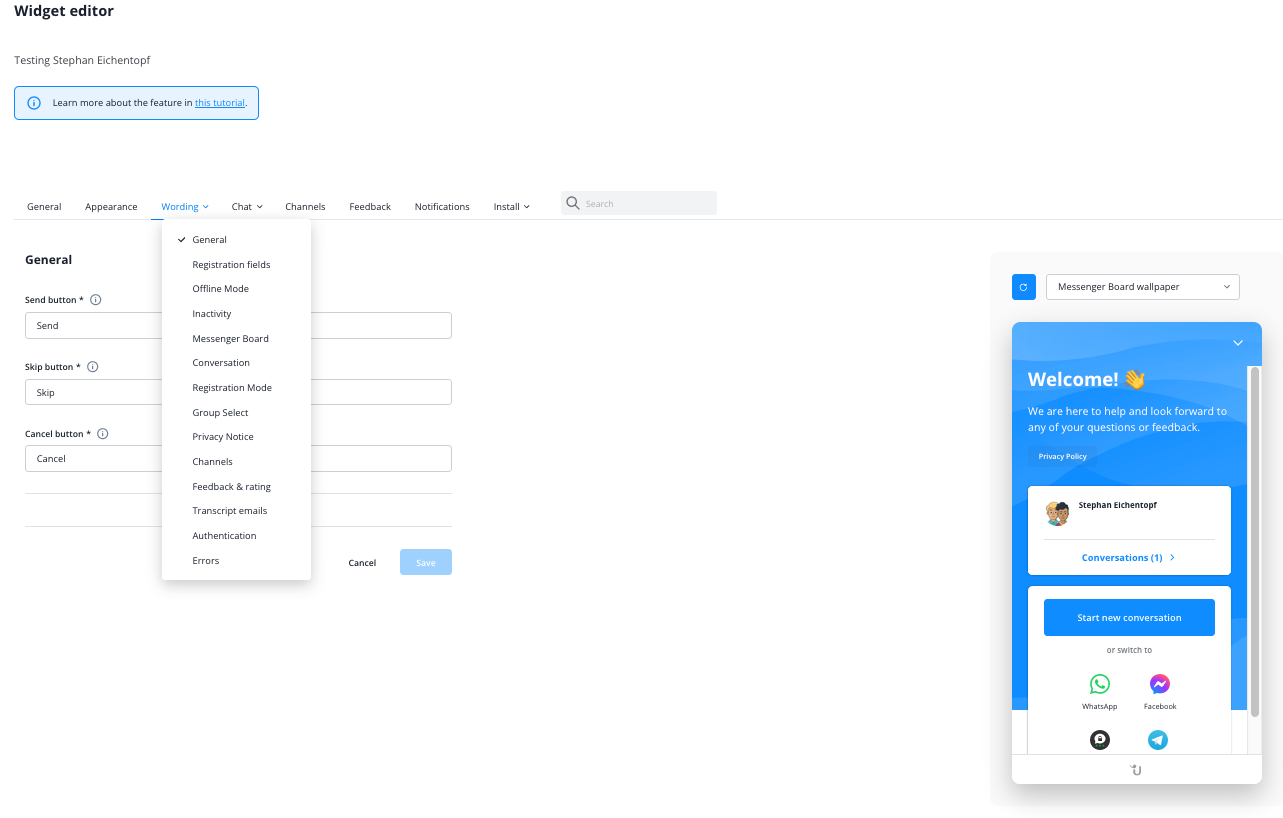
Wording
Here you can customize the text that is displayed in your Widget depending on its chat mode and behavior settings. Use the dropdown menu to reach all settings. Check out the preview to the right as you edit the texts. It allows you to immediately see how your new texts will look in the Widget.
- General: Basic texts displayed on multiple screens.
- Messenger Board: Texts displayed on the Widget’s opening screen.
- Conversation: Texts displayed in and around the Widget’s dialog area. This includes the texts of our call feature.
- Registration Mode: Texts displayed in Registration Mode.
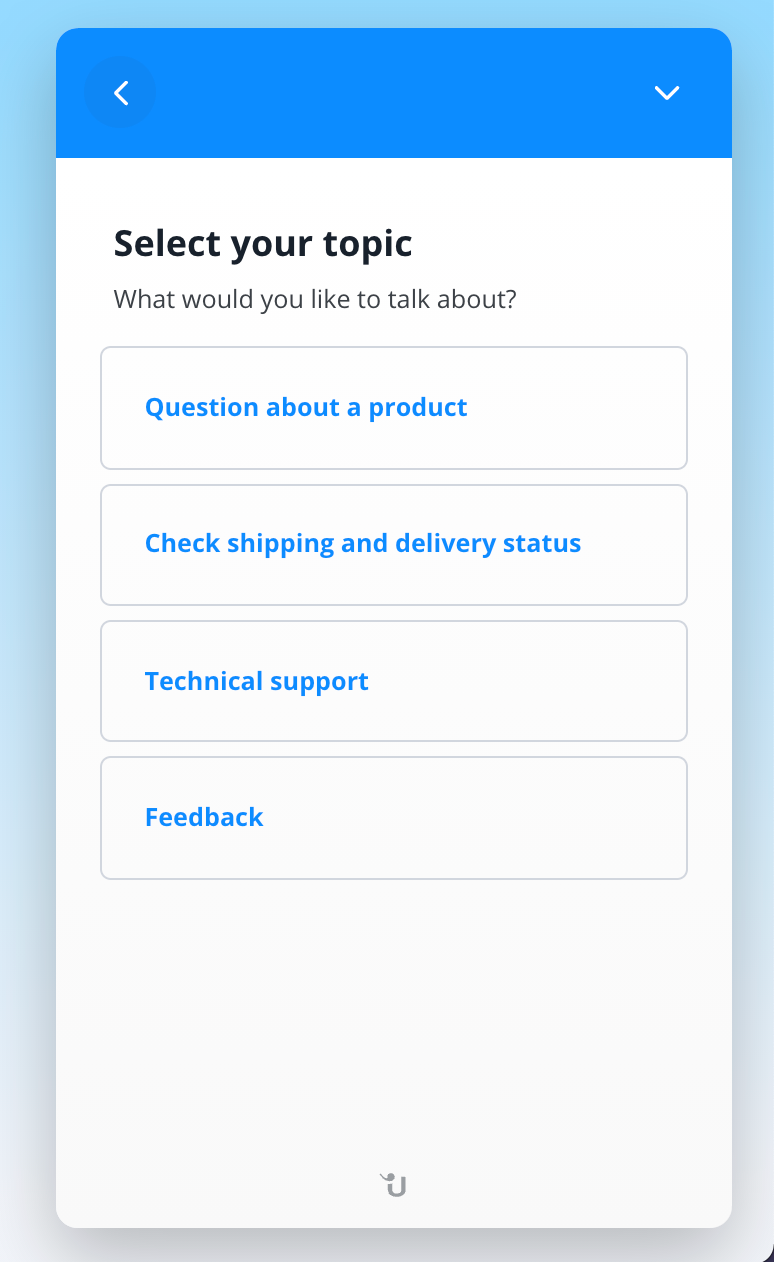
- Group Select: Texts displayed in the operator group selection window.
- Offline Mode: Texts displayed when none of your operators is available.
- Inactivity: Texts sent to contacts as fallback operator messages if you enable Inactivity prevention under Chat >Behavior.
- Feedback & rating: Texts of the feedback and rating screen and your surveys.
- Privacy notice: Texts displayed on the privacy notice screen, which you can enable under Chat > Data privacy.
- Transcript: Texts of the transcript request screen and the transcript email, which you can sent to contacts after conversations. Here you can also add links to your social media profiles.
- Chatbots: Texts displayed if you’re using a chatbot.
- Authentication: Texts of the authentication screen, which your contacts see when they return to your website and try to access older conversations.
- Errors: Texts of error messages displayed in different situations.
Tip: You can add operator- and contact-related information to your Widget using placeholders. Please note that some placeholders cannot be used in certain text fields. This prevents them from remaining empty if the corresponding data is not available.
Placeholder | Description |
{{name}} | Responding operator’s name |
{{client_name}} | Contact’s name |
{{client_email}} | Contact’s email address |
{{loc_city}} | Contact’s location (city) |
{{loc_country}} | Contact’s location (country) |
Chat settings
Here you define how your Widget interacts with your contacts. Open the following sections via the dropdown menu.
- Behavior: Define how a conversation should start and run, and enable voice messages, tracking, and conversation transcripts.
- Routing: Select routing modes to connect your contact to the right operator.
- Data privacy: Adjust the data privacy settings to adhere to your local regulations.
- Service times: Define service times and base your Website Messenger’s availability on it.
- Advanced: Adjust detail settings on cookies, contact notifications, transcripts and links.
Approach
Here you configure how a conversation between you and your contact is started.
Under Chat > Advanced, you can choose to hide the Website Messenger button in all chat modes when no operator is available or outside of your service times. Define your service times under Chat > Service times.
Online modes
Normal
The default chat mode. Any contact can immediately start a chat by clicking the chat button.
Registration
Any contact can start a chat after filling in a name and email address. This is a powerful feature to collect leads and filter for high-quality chats. Keep the registration optional if you want to also offer support to contacts not willing to leave their data.
Proactive
Above the chat button, a message bubble automatically pops up to contacts with a message when they’ve been on your website for a time that you define. An operator is notified once contacts respond to the automated greeting.
Registration or proactive
Contacts can start a conversation after filling in their name and email address. If they don’t click the button, the proactive message bubble will automatically pop up when they’ve been on your website for a time that you define. In this case, the registration form is not displayed.
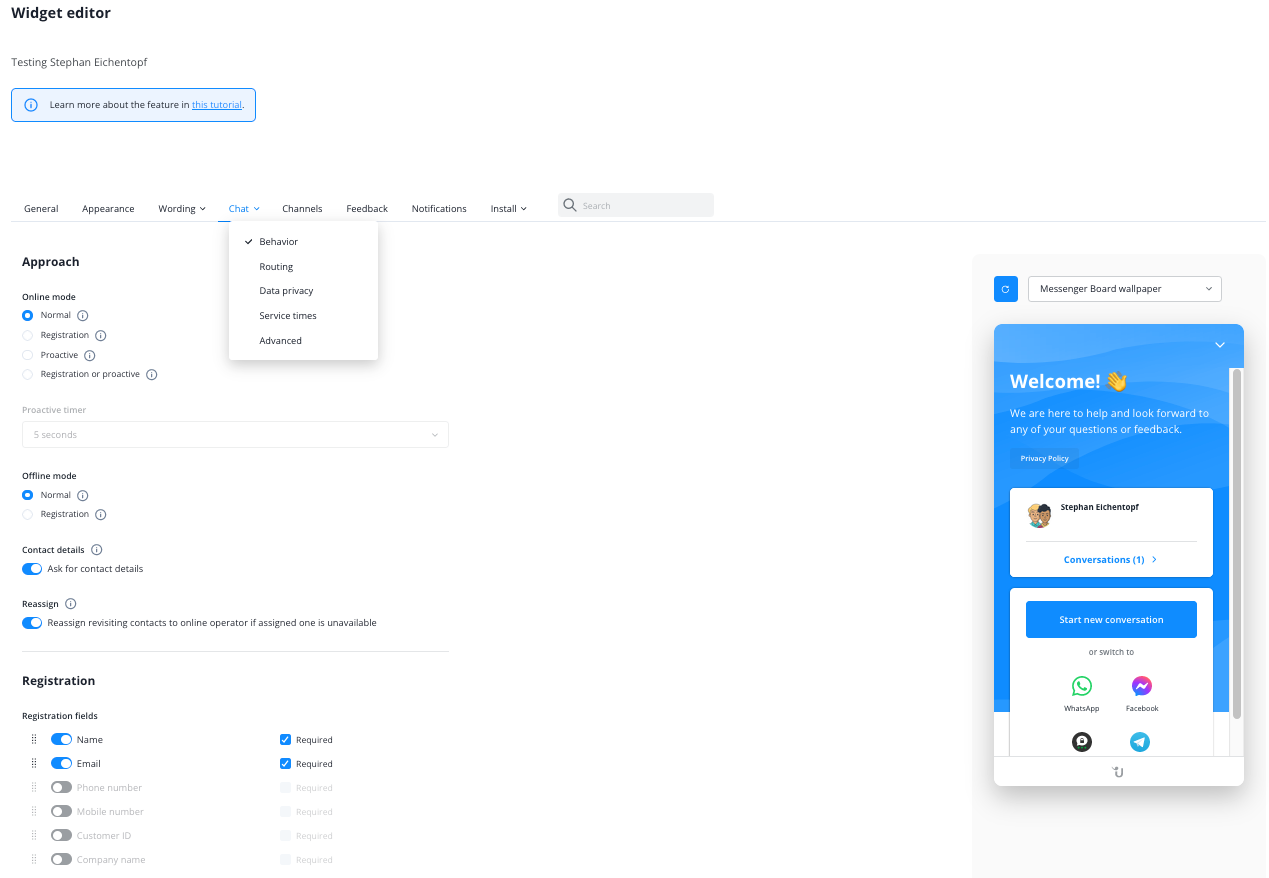
Offline modes
Choose how your Widget behaves when operators are unavailable.
- Normal: When no operator is available, contacts can send you conversations with or without contact details, thus choose to stay anonymous. However, if they do leave without entering their contact information, your response will only reach them if they return to the Website Messenger.
- Ask for contact details (suboption to Normal mode): Enable this option to ask contacts for their contact details in the Website Messenger in offline mode. It also activates a reminder that pops up when contacts close the Website Messenger without leaving their contact information. If you do not want to receive any contact details, make sure to also uncheck Contacts can request transcripts under Chat > Advanced.
- Registration: When no operator is available, contacts have to leave their contact details in order to start a conversation. This allows you to prevent spam and focus on serious enquiries by contacts who you can definitely reply to.
- Reassign revisiting contacts to online operator if assigned one is unavailable If a contact resumes a conversation while the assigned operator is not available, the conversation is forwarded to an available operator. If this option is disabled or no operator is available, we send an automatic offline reply from the operator. You can edit it under under Wording > Offline mode.
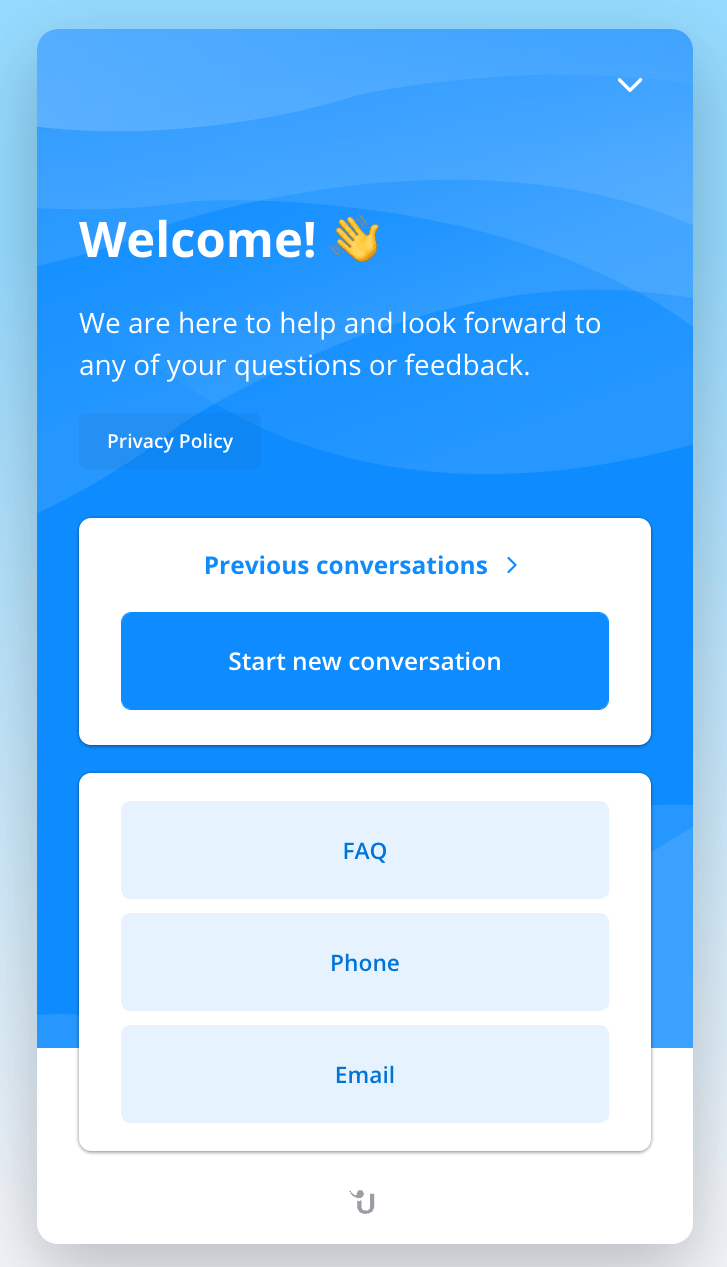
Messenger Board
In the section Chat > Behavior of the Widget Editor, you can configure the behavior of the Messenger Board, the cover page of your Website Messenger.
Enable/disable the Messenger Board
If enabled, the Messenger Board will be displayed when contacts click the chat button. If disabled, clicking the chat button will take them directly to a new conversation.
Quick links
Add button links at the bottom of the Messenger Board to point contacts to important pages or external contact channels. You can choose between the “http”, “mailto”, “sms” or “tel” format and add up to three links. Here are some example URLs for each format:
- Hyperlink:
https://www.userlike.com
- Mailto link:
mailto:lisa.abel@userlike.com
- Telephone link (include country code):
tel:+492211234567
- SMS link (include country code):
sms:+491761234567
To open links in a new tab, simply check the box underneath its URL field.
Inactivity prevention
More than in any other customer channel, people expect an immediate reply in chat. Our inactivity prevention feature acts as a safety net and allows you to define automatic actions that are triggered when your operators don’t answer quickly enough.
Note that any reassignment is done based on your routing settings.
Unanswered live conversations
Here you define actions for when a contact starts or resumes a conversation while the assigned operator is online. Define a time between 10 seconds and 5 minutes after which one of the following actions is automatically triggered:
- Disable. No automatic action is taken to prevent inactivity in live conversations.
- Send inactivity message first, reassign conversation if still inactive. First, your inactivity message live is sent to the contact. If the timer runs out once more without your operator replying, the conversation is assigned to another online operator. If there is no operator available to receive the conversation, your Inactivity message offline is sent to the contact. You can adjust both messages under Wording > Inactivity.
- Reassign conversation immediately. The conversation is immediately reassigned to another operator. As in the option above, your Inactivity message offline is sent to the contact if reassigning fails.
Unanswered offline conversations
Here you define actions for when a contact starts or resumes a conversation while the assigned operator is not available. Define a time between 30 minutes and 48 hours after which one of the following actions is automatically triggered:
- Disable. No automatic action is taken to prevent inactivity in open conversations that receive no operator reply for a longer time.
- Unassign conversation and move it to Inbox. The conversation is unassigned and moved to the Inbox, where any operator in your group can see and answer it.
- Reassign conversation to another operator. The conversation is reassigned to another, available operator, who can reply right away. Just like for live conversations, the Inactivity message offline is sent to contacts if reassigning fails.
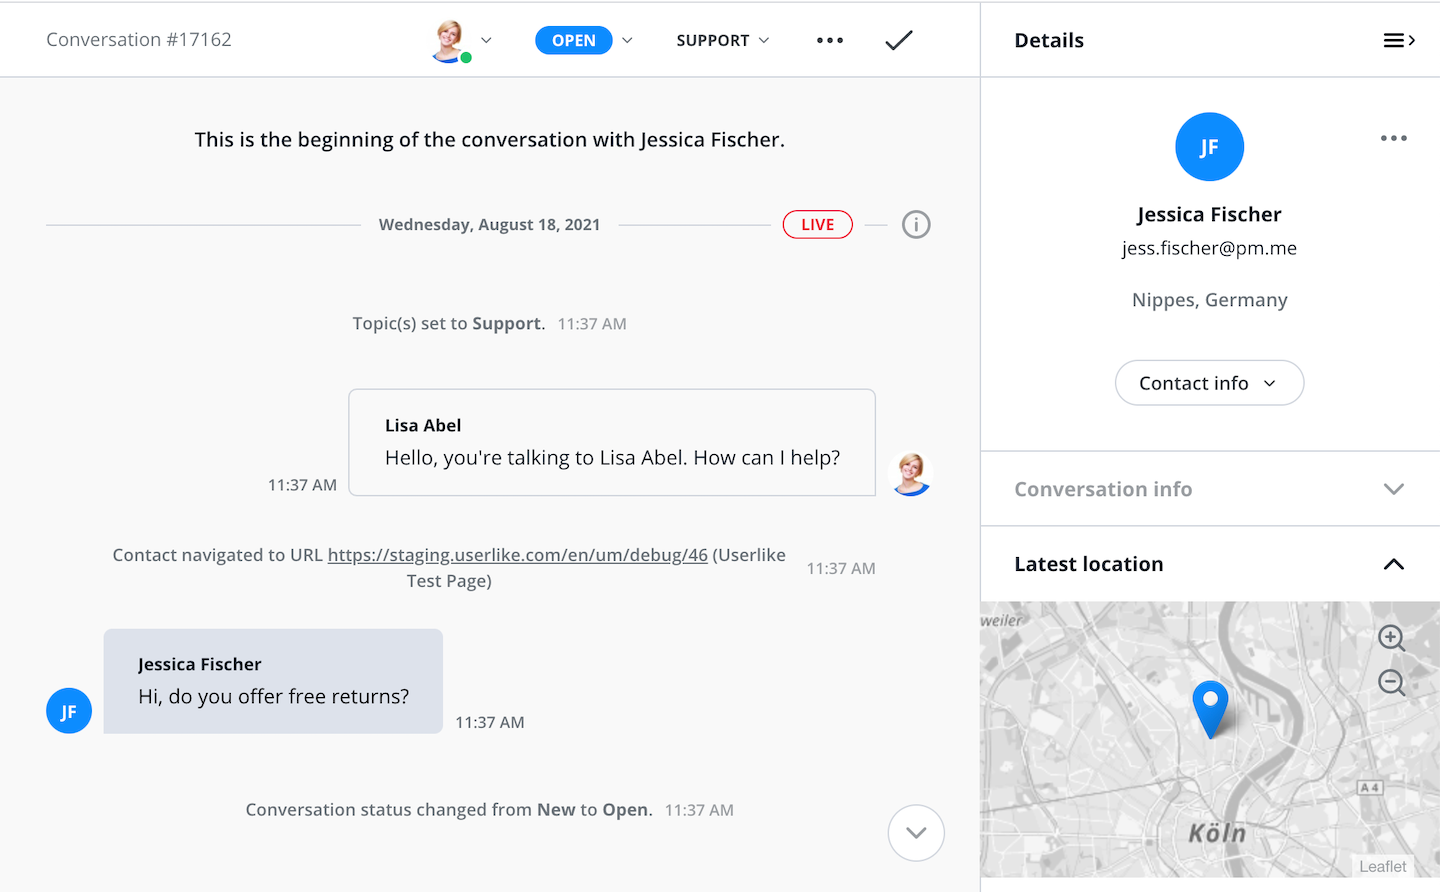
Contact location
We support two different technologies to identify your contact’s location and thereby provide a more personal support. You can gather locations via our backend or the contact’s browser. The latter is more precise.
- Don’t gather: No info about your contact’s location is collected.
- Geolocation IP: You estimate your contact’s location based on her IP address.
- Geolocation Browser API: Your contact’s location is determined through her browser API. This is accurate but the contact needs to grant permission. If she doesn’t or her browser doesn’t support the feature, the location lookup will fall back to Geolocation IP.
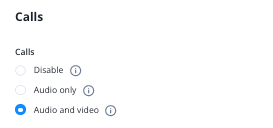
Calls
Allow your operators to easily switch from customer chats to video calls and screen sharing. Perfect for clearing up more complex issues or capturing a warm lead. Contacts have to be online in the Website Messenger and grant permission to their microphone (and camera). They can choose to accept or decline the call. Any operator can only have one call at a time.
- Disable: Don’t allow operators to offer audio or video calls.
- Audio only: Allow operators to offer audio calls, but disable video and screen sharing.
- Audio and video: Allow operators to offer calls with video and screen sharing.
Select the media types available to your contacts and operators. Note that the SMS channel does not support media files. Also, these settings only apply to contacts if they’re using the Website Messenger, so it will not affect their media options on other messenger channels.
Supported media
- Operators can share files: operators can upload and send files in conversations.
- Contacts can share files: contacts can upload and send files in conversations. You can only disable this option for the Website Messenger. If contacts use a different channel, the channel’s own settings apply.
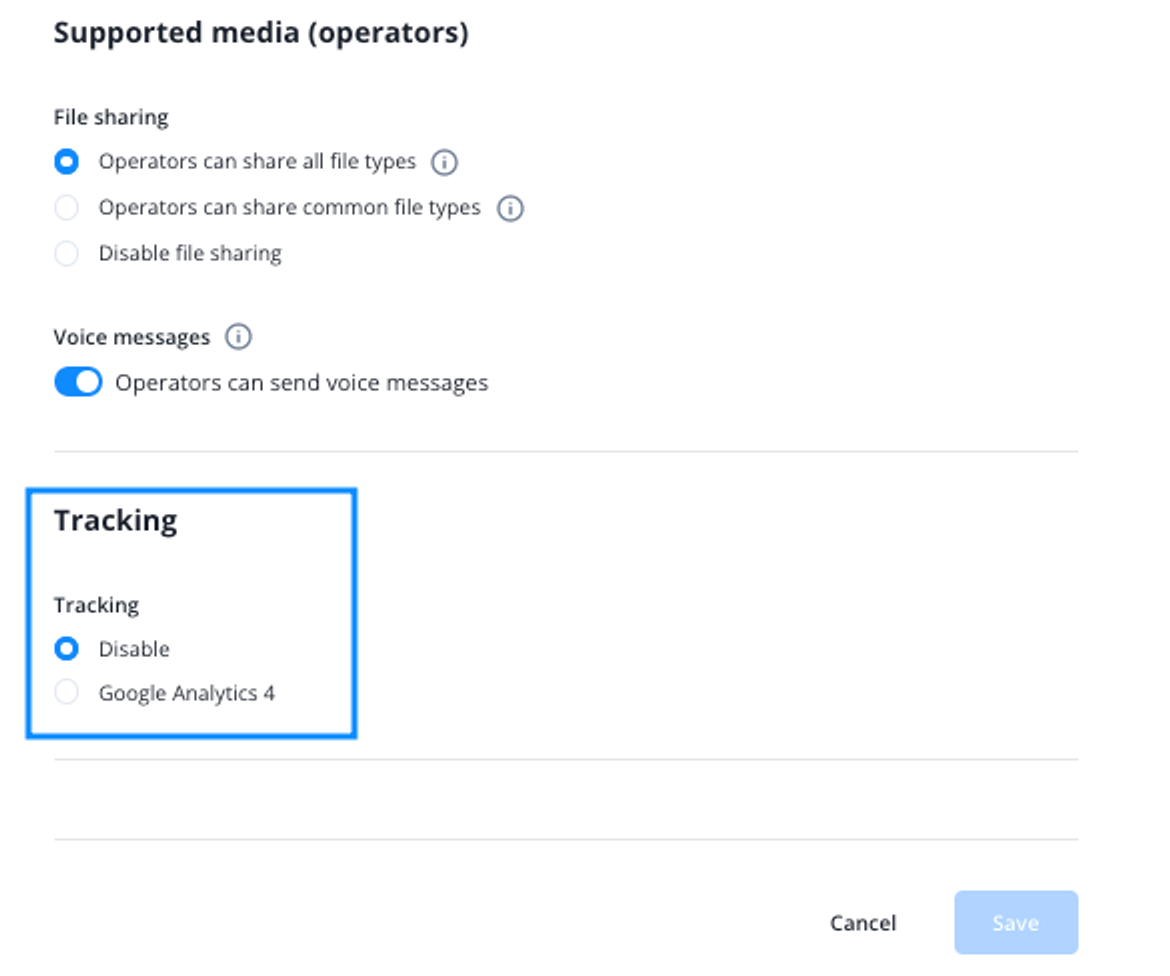
- Operators can share all file types:Allow operators to share any file type in conversations, including those that may be open to abuse. Otherwise, operators can only share images, videos, audio, plain text and PDF files.
- Contacts can share all file types:Allow contacts to share any file type in conversations, including those that may be open to abuse. Otherwise, operators can only share images, videos, audio, plain text and PDF files.
- Operators and contacts can send voice messages: Enables the sending and receiving of voice message recordings.
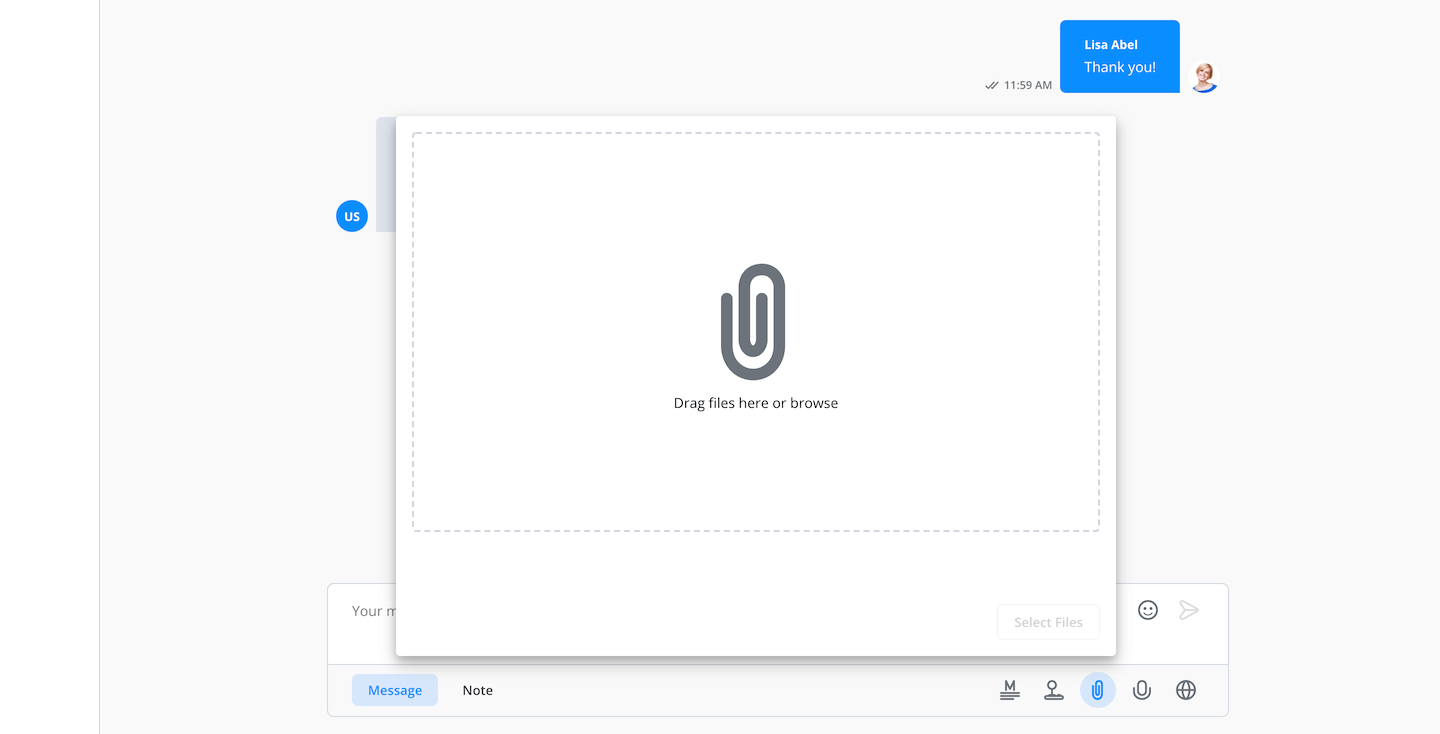
Our built-in file upload tool supports all common file formats - be it pdf documents, png or jpeg files. The maximum upload size is 100 MB. There is no limit on the length of voice messages. Only the maximum upload size of 100 MB applies here as well.
Tracking
Activate third-party tracking by Google Analytics on your Widget to analyze its performance on your website. The Widget will now track Userlike chat events and its data will be accessible in your Google Analytics account.
For this, we pass a small subset of events directly to your on-page Google Analytics tracker or more specifically, the first Google Analytics tracker we find on the page. These are the events we send to it:
Event | Description |
Contact_sent_message | Contact sent message to operator |
Contact_received_message | Operator sent message to contact |
Chat_session_started | Conversation session started |
Proactive_chat_offered_to_Contact | Proactive chat offered to contact |
Proactive_chat_session_started | Proactive conversation started by contact message |
If you wish to connect a different tracking solution and access a much wider range of events, you can do so using our client tracking API. To learn more, check out this tutorial.
Routing
Here you define how an operator is selected to receive an incoming chat from your contact. This helps you connect your contacts to the best-suited operators.
- Default setting: The chat is routed to an operator from an operator group that you define.
- Group Select: Before the conversation, your contact chooses an operator group from a selection of groups that you define.
- Skills: Your contact is routed to an operator who possesses a skill set that matches the one you define for this Widget.
If you enable the option to hide the Website Messenger button when no operator is available under “Chat > Advanced”, this will also apply when no operator with the right skill set is available.
Data privacy

Here you find the data privacy settings of your Widget. They apply in all chat modes and help you adhere to your local data privacy regulations.
- Don’t gather personal data from your contacts except for data they provide themselves, for example in Registration Mode.
Enable this option to not store and send any unwanted contact data. This includes the visitor IP, user agent, browser, operating system, country, location, referrer and page visits. Note that the setting doesn’t apply to data contacts enter themselves, like their email address or name. It also doesn’t affect custom data that you push from your business layer into Userlike via the Messenger API.
- Display data privacy link:
Add a link to the widget that points to the data privacy page on your website.
- Show a data privacy notice before the chat to request your contacts’ consent. Customize the text under Wording > Privacy notice.
Display a data privacy note in the Website Messenger that your contacts have to accept in order to start a conversation. Note that it won’t be displayed if the chat is opened automatically in proactive mode.
- Enable or disable Live Preview, typing indicators and identity lookup.
Advanced
Here you can fine-tune your Widget with additional settings:
- Set a time after which your contacts’ cookies expire. This also defines how long our system recognizes them and when they will have to reauthenticate themselves in order to regain access to their conversation history.
- Set a time after which conversations are considered inactive and ended. This also defines when the conversation transcript is sent, add-ons are triggered, and the responding operator’s chat slot is freed up.
- Enable wildcard cookies if you want to use the Widget on multiple subdomains.
- Adjust your contacts’ notification settings for a more subtle or a more engaging approach.
- Let Userlike automatically delete empty conversation transcripts.
- Allow contacts to request conversation transcript emails in conversations. These will be sent to them once the respective conversation session ends.
- Specify an email address that your contacts can reply to from all emails that they receive from you.
- Allow contacts to reply to transcript emails via email and receive their replies as messages in the Message Center.
- Enable the email callback API to handle automatic emails with your own system.
- Adjust how links sent in conversations are opened.
- Hide the Userlike logo.

Channels
You can add your channels to your messenger board. More information regarding channels can be found in our dedicated tutorial: Channel tutorial
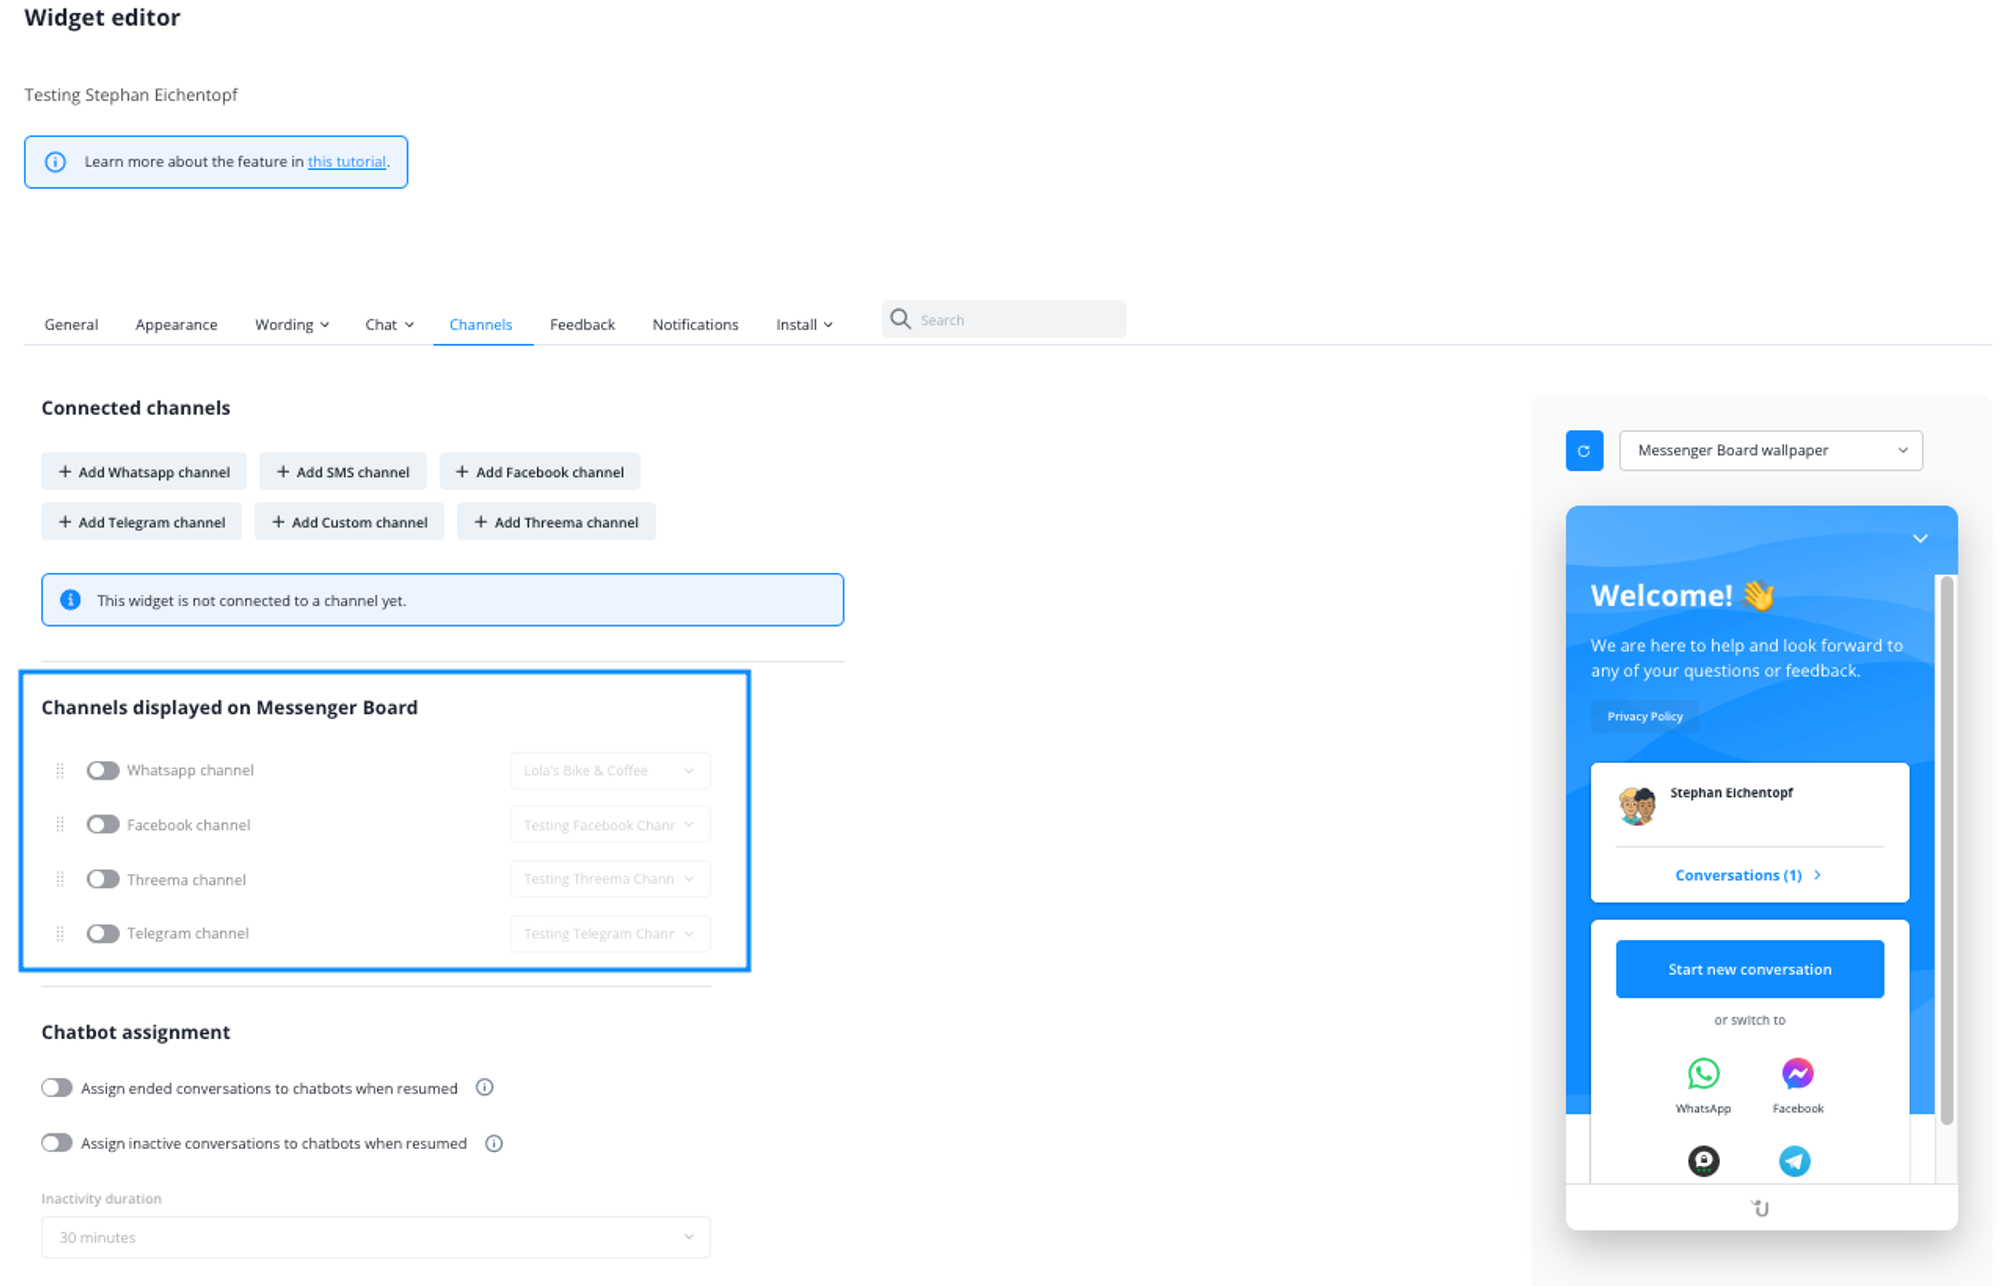
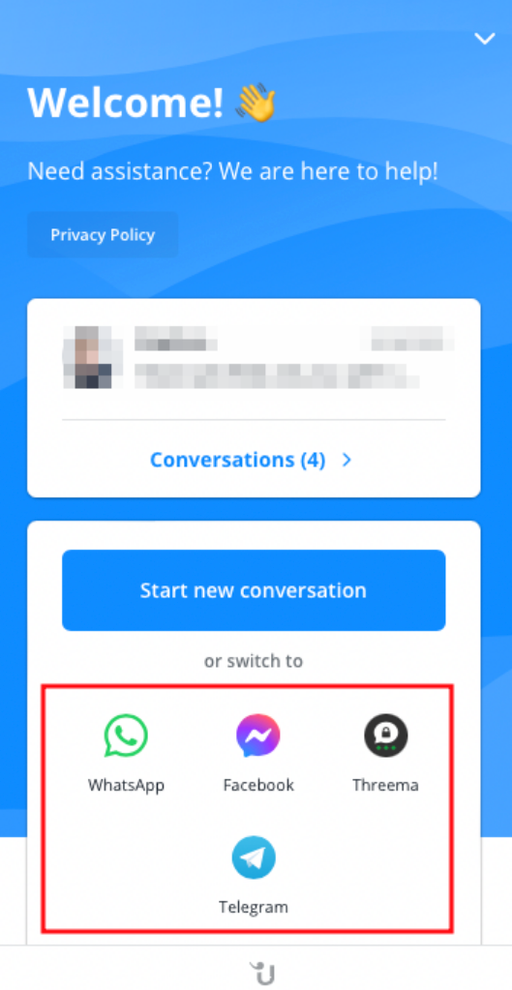
Select the channels you want to be visible in your Messenger Board and click on “update widget”.
Your messenger board will now show links to the channels you selected before and your customers can click on them to open the dedicated messenger app.
You can also set up chatbot assignments to resumed conversations and which automated messages should be sent within your channels.
Contact feedback
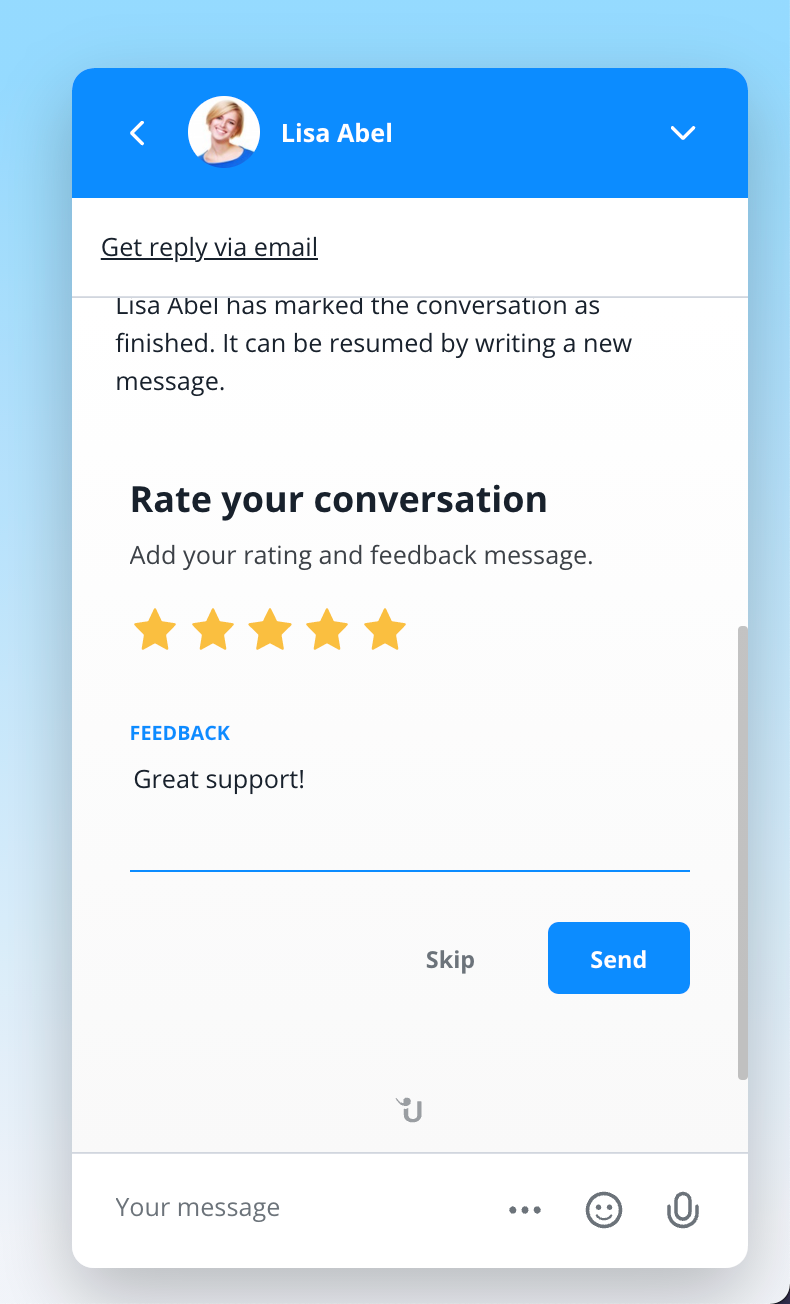
Feedback & rating
- Enable this feature to invite contacts to rate their conversations with you after they’re finished and leave optional feedback. Adjust the screen’s text in the Wording tab under Feedback & rating.
- Review your chat ratings in the Dashboard under Analytics > Quality.
Survey
- Enable the survey before the conversation to gather information about the contact’s type of request.
- Enable the survey after the conversation to gather the contact’s opinion on your support performance.
- Again, customize the texts under Wording > Feedback & rating.
- Review the statistics of your survey results in the Dashboard under Analytics > Goals, topics, surveys.
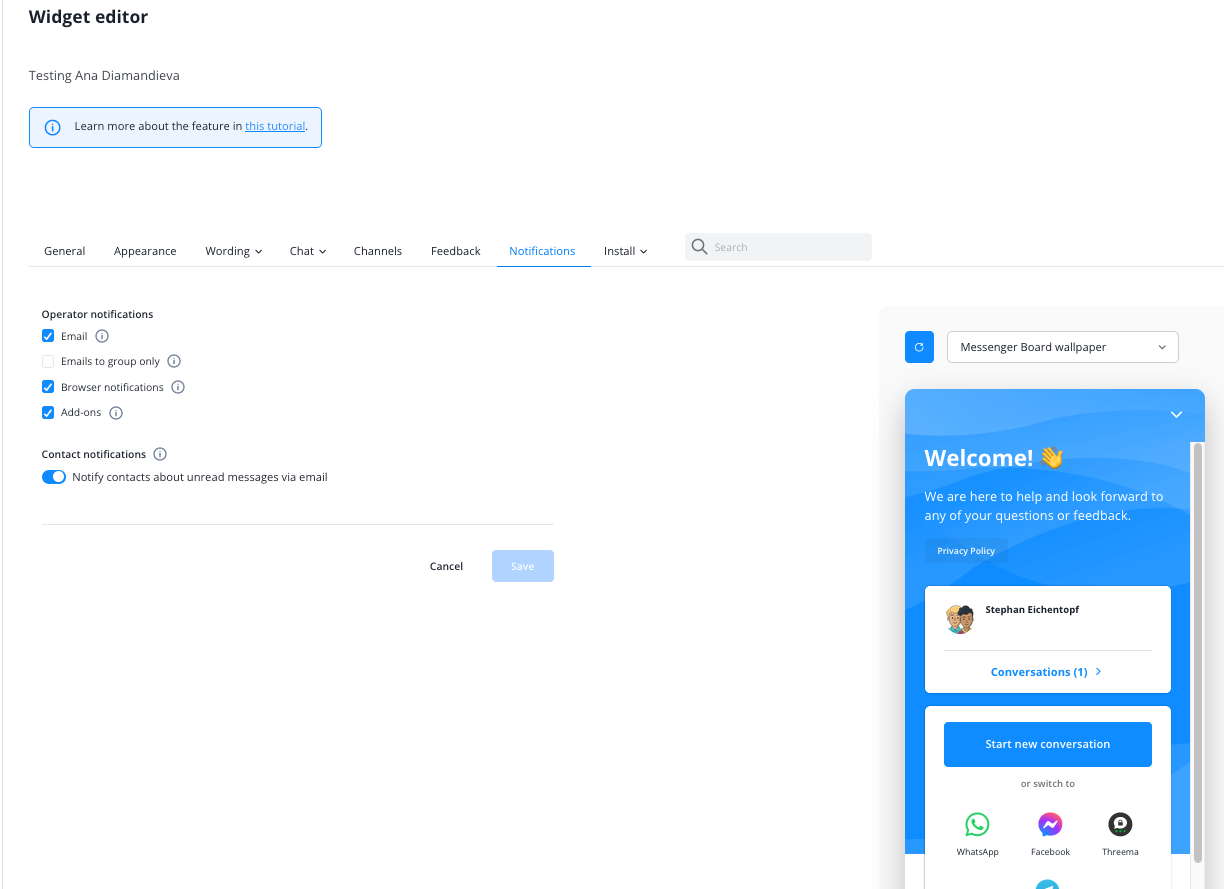
Notifications
Here you can define global notification settings for your operators and contacts. Note that the operator notifications set here only apply to events that the relevant operators have subscribed to in their profile settings.
- Emails: Send email notifications for chat events of this Widget to all operators.
- Email to group only: Send email notifications only to operators within the main operator group assigned to this Widget.
- Browser notifications: Send browser notifications for chat events of this Widget to all operators.
- Add-ons: Trigger add-on events on this Widget for all enabled add-ons.
- Notify contacts about unread messages via email.
Here you find everything you need to integrate the Widget into your website, deploy it in one of our third party plugins, or run it via an external application.
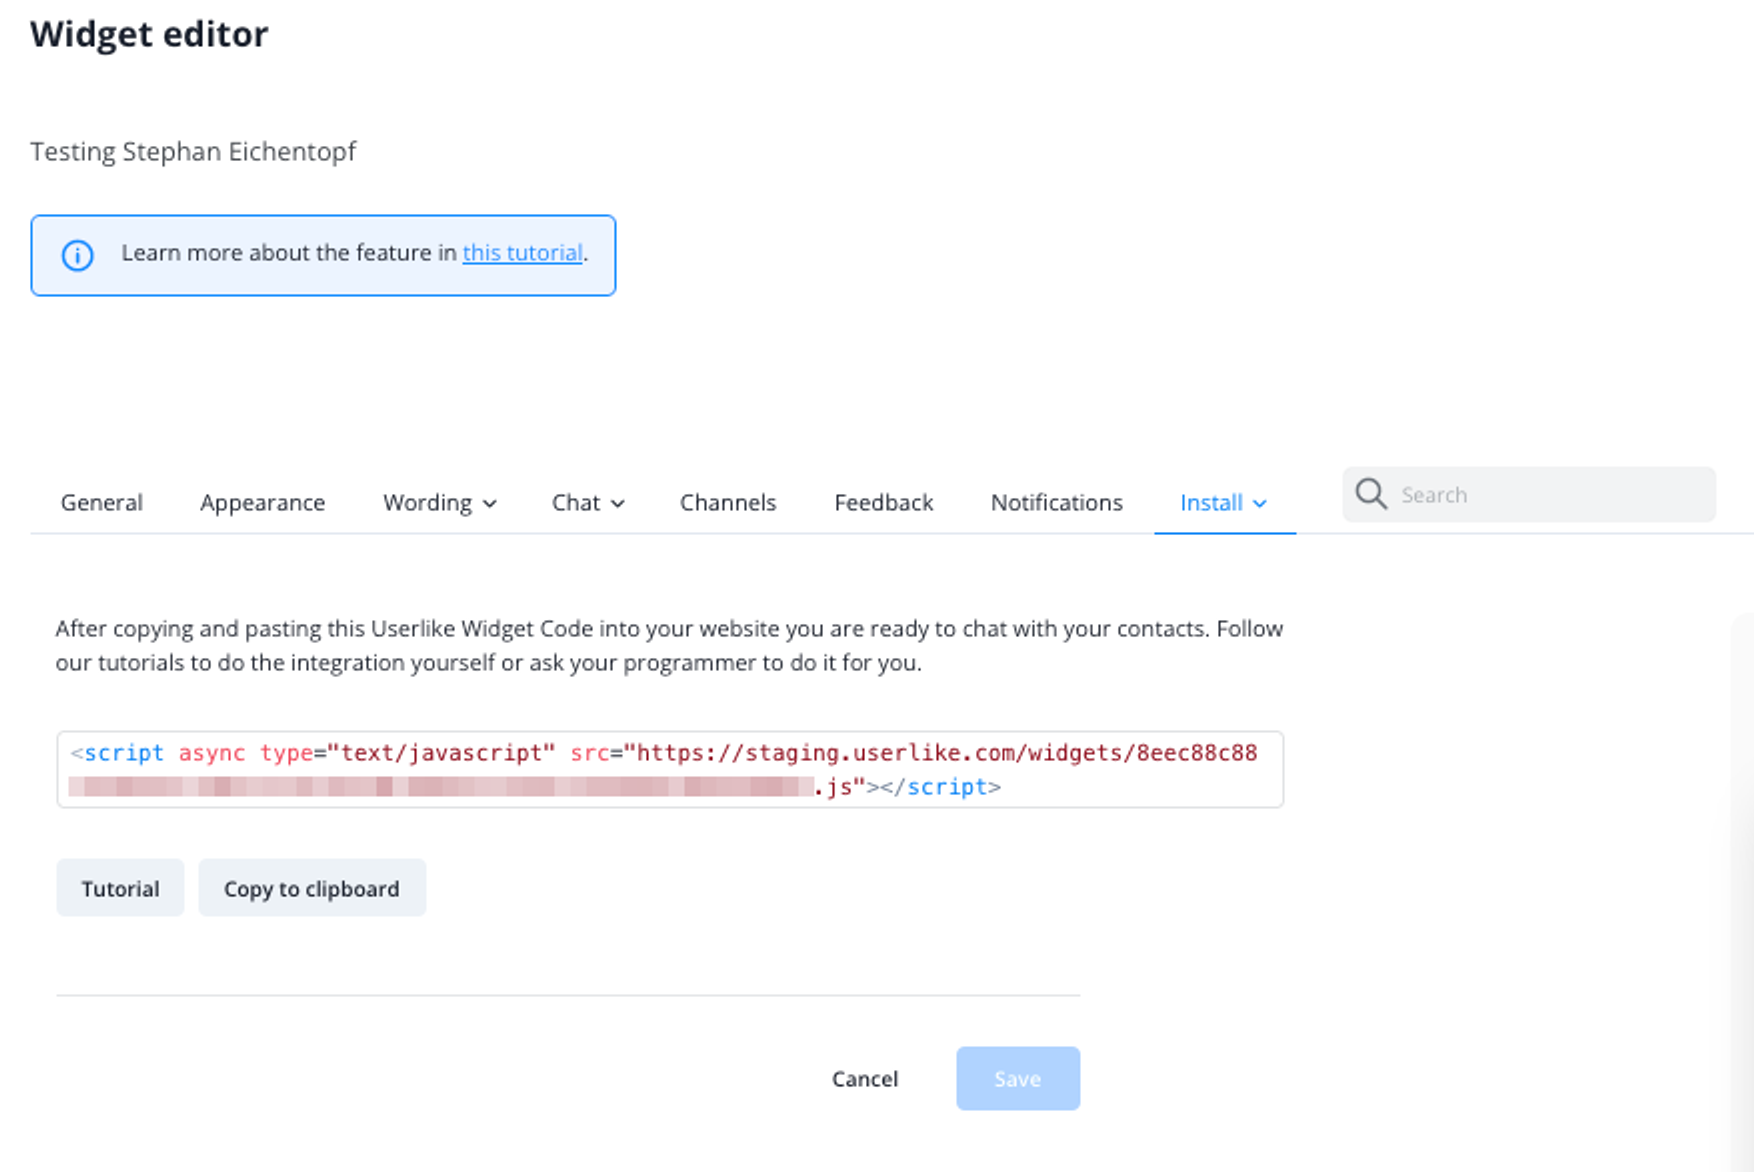
Install
- JavaScript Widget code: Get your unique Widget code, which you need to integrate Userlike into your website.
- Credentials for applications: Find your Widget credentials, the app key and Widget key, which you need for our third party plugins and applications.
In the section JavaScript Widget code, you can choose to replace one of your existing live Widgets with the Widget you’re editing.